Monday, August 24, 2009

French Onion Soup

I'm weird about onions. I won't eat them raw, like on a sandwich or hamburger, unless they're chopped up in salsa, and I really don't like red onions. I find them to be incredibly strong. But I will go to town on some onion rings and French Onion Soup. I've had this soup at restaurants before where it was really good, and the Husband made me some French Onion Soup years ago right after we were married that was wonderful. A few weeks ago, the Husband and I went to a local restaurant where I ordered a crock of French Onion Soup. They may as well have called it French Where's-the-Onion Soup, because as I slurped my way closer and closer to the bottom of the bowl, the only things I had consumed were infinitely salty beef broth, some croutons and a mass of stringy cheese. The only things in my soup that resembled onions were microscopic and had been cooked to an oblivion and had started to disintegrate. Very disappointing. That experience was not wasted, though, as it spurred me to make this recipe the following week.


French Onion Soup

Prep: 20 minutes
Cook: 50 minutes
Serves: 4

2 T butter or stick margarine
4 medium onions, sliced
2 cans (10.5 oz) condensed beef broth
1.5 C water
1/8 t pepper
1/8 t dried thyme leaves
1 bay leaf
4 slices French bread, ¾ to 1 inch thick, toasted
1 C shredded Swiss or mozzarella cheese
¼ C grated Parmesan cheese

1. Melt butter in 4-quart nonstick Dutch oven over medium-high heat. If desired, cook onions in 12-inch nonstick skillet; after cooking, transfer onions to Dutch oven to complete the soup. Stir in onions to coat with butter. Cook uncovered 10 minutes, stirring every 3-4 minutes.

2. Reduce heat to medium-low. Cook 35-40 minutes longer, stirring well every 5 minutes, until onions are light golden brown (onions will shrink during cooking.)

3. Stir in broth, water, pepper, thyme and bay leaf. Heat to boiling; reduce heat. Cover and simmer 15 minutes. Remove bay leaf.

4. Set oven to broil. Place bread in 4 ovenproof bowls or in individual casseroles. Add onion soup. Top with Swiss cheese and sprinkle with Parmesan cheese. Place bowls on cookie sheet or in pan with shallow sides.

5. Broil with cheese about 5 inches from heat 1 to 2 minutes or just until cheese is melted and golden brown. Watch carefully so cheese doesn’t burn. Serve with additional French bread, if desired.


I think with this recipe, I was so excited to make it that I didn't slow down the process enough and consider it from all angles. First, I was so focused on just getting the onions sliced that I didn't ensure they were sliced thin enough and that all slices were made with a cut of the same width. Looking back, some slices were cut perfectly and some were cut a little on the wide side, so the end result when they were all in the pan was that some cooked too fast and some didn't get the full amount of cooking time required. The thinnest slices were starting to burn just as the thicker slices were turning that nice golden brown that is evident of French Onion Soup. So that was an issue.

The other thing was that when I was in the store, I decided I really didn't want to buy a whole loaf of French bread just for the two slices required for this recipe. I decided to use some whole wheat sandwich buns I already had. Wrong! Even after toasting said sandwich buns, they immediately began to get soggy upon putting them in the bowl with the soup, plus the buns were nowhere near dense enough to match French bread. Most unfortunate.

And going back to the onions, I opted to cook them in a non-stick skillet before putting them in the soup pot. Once they were done, or more precisely, once I could see that any further cooking would result in some incinerated onion slices, I put them into the pot with the broth and other ingredients.

I also used slices of Provolone to top the soup instead of Swiss cheese, simply because I had Provolone on hand. It was good and I could tell no difference between that type of cheese and any other that would be appropriate for this soup. It's gooey - it's melty - it's good.

French Onion Soup


The ultimate decision, however, is how the soup tasted. It was... okay. Not mind blowing. Much better than the restaurant soup that I had, but still not awesome. It was the onions and the soggy bread that really sealed the deal. However, this can easily be remedied to make a better soup next time. I really want to perfect this before fall.

Spiced Pita Chips and Greek Feta Spread

I intentionally chose these two recipes to go together for this blog entry. I figured they were ideal partners and what good is one without the other? There are probably other options when it comes to dipping pita chips, but this Greek-style dip was as good as any.


Spiced Pita Chips

Ingredients
2 tablespoons olive oil
1 teaspoon ground cumin
1/2 teaspoon ground coriander
1/4 teaspoon cayenne pepper
1/2 teaspoon garlic powder
1/4 teaspoon fresh ground black pepper
1/4 teaspoon salt
3 whole-wheat pitas, cut into 1/8's

Directions
Preheat oven to 350 degrees F. Combine olive oil and all spices in a large bowl. Add pita wedges and toss to coat, Spread in 1 layer on a baking sheet and bake for about 15 minutes, tossing once, or until pita is brown and crisp. Cool completely before serving.


Greek Feta Spread

½ lb Greek or French feta cheese
3 T extra virgin olive oil
1 garlic clove, thinly sliced
1 T minced fresh mint or 1 t crumbled dried mint
¼ t red pepper flakes, plus more as needed
6 Italian pepperoncini, plus more as needed, chopped

In a food processor, combine the cheese, olive oil, garlic, mint, the ¼ t red pepper flakes and the 6 chopped pepperoncini and process until smooth. Taste and add more red pepper flakes or pepperoncini as needed. Makes 1 ½ cups, serves four.


I made the pita chips first. I used whole wheat pitas and decided to halve the recipe. However, to provide the optimum amount of spice, I decided to keep the olive oil and spice amounts the same as if I were doing the full recipe. This turned out to be a wise decision, as the spices wouldn't have gone nearly as far if I had halved them, too. I mixed the olive oil and spices in a small bowl and dumped the triangular-cut pitas in there and just swirled it all around with a spoon. The pitas appeared to absorb a lot of the oil and I really had to make sure everything was distributed evenly. But once I was satisfied, I put them on the baking dish and popped them into the oven. They crisped up nicely, but still could have used more spice. After a day or two, they actually started to get a little tough and brittle, but they were still good and the spice held well.

Then I made the Greek feta dip. In this recipe I halved (approximately) the feta, olive oil and pepperoncini, but kept the full amounts of garlic, red pepper flakes and mint. I dumped everything into my mini food processor and took it for a spin. I even plated it up nicely for a photo op.

Spiced Pita Chips and Greek Feta Spread


So the pita chips are done and I have dip for them. I scooped up a bite of dip on the chip and as the combination met my tongue, my taste buds immediately began to seize up and retreat from the bitterness of the pepperoncini. Whoo! It definitely had a bitter twinge to it, but I think it was just that first bite that threw me off. The feta was adequately pungent, but the peppers added a definite kick. It wasn't hot, just an overwhelming bitter taste. So I threw it into the fridge to chill and let the flavors meld. The next night I tried it again and it had definitely softened overnight. The bitter taste was muted and the fact that it was cold, and not room temp, made a big difference. But still, I was faced with a small bowl of dip and a few remaining pita chips. What to do?

My answer came as my eyes settled on a refrigerated dough pizza crust I had just purchased. I pulled out the dough, slathered on some homemade pesto, and added some turkey pepperoni, fresh oregano, the remaining slices of a ball of mozzarella I used earlier in the week, sliced up half of a red pepper, and dolloped on the rest of the Greek feta spread. Genius! The perfect way to clean out the fridge and use the rest of the feta spread in a way that wouldn't be totally overwhelming to my senses.

Thursday, August 6, 2009

Extra recipe - Salmon with Snap Peas, Yellow Peppers and Dill-Pistachio Pistou

This is officially the longest title of a recipe I have cooked as of yet. But longer does not necessarily mean better. Nor can you guarantee that a recipe from a renowned cooking magazine will be the best thing you have ever eaten. I'm here to prove my case.


Salmon with Snap Peas, Yellow Peppers and Dill-Pistachio Pistou
Serves 4

1/3 C chopped fresh dill
1/3 C finely chopped green onions
1/2 C shelled natural pistachios or almonds, toasted and finely chopped
1/4 C plus 1 1/2 T pistachio oil or extra-virgin olive oil
2 yellow bell peppers or orange bell peppers, cut into 1/2-inch strips
1 pound sugar snap peas, trimmed, strings removed
1 garlic clove, minced
1/4 C water
4 6-ounce salmon fillets

Mix dill, green onions, pistachios and 1/4 cup of oil in a medium bowl. Season to taste with salt and pepper.

Heat 1/2 T oil in a heavy large skillet over medium-high heat. Add peppers and saute until beginning to soften, about 2 minutes. Add snap peas, garlic and 1/4 C water; sprinkle with salt. Saute until vegetables are just tender and water evaporates, 2 to 3 minutes. Stir in 1 rounded tablespoon pistou. Transfer vegetables to platter; tent with foil to keep warm. Reserve skillet (do not clean).


Heat remaining 1 tablespoon of oil in reserved skillet over medium-high heat. Sprinkle salmon with salt and pepper. Place salmon, skin side down, in skillet; cook until skin is crisp, about 3 minutes. Turn salmon and cook until almost opaque in center, about 3 minutes longer. Arrange salmon fillets over vegetables on platter. Spoon some pistou down center of each fillet and serve, passing remaining pistou alongside.


I love picking up magazines in the airport when I travel because it means I have my pick of titles I would ordinarily never purchase. This is one of them, Bon Appetit. Not only are the articles very entertaining and informative, but the food always looks so incredibly good. I have a very long way to go before my photography matches the styling in this magazine. A recipe will usually catch my eye if it has all kinds of yummy ingredients - in this case, salmon, colorful peppers and pistachios. All things I love. But it was very unfortunate that those three things did not work well in this recipe.


First, the pistou. I can only imagine it's pronounced like "pea-stew," but with a lot less Southern twang than would normally be associated. It's a lot like a basil pesto, except you're subbing dill for basil and subbing pistachios for pine nuts. It looks nice when it comes together, but for some reason the tastes just didn't work out for me.

Pistou


Next, the salmon. In past blog posts I have raved about the frozen fish selection at Target. With the exception of the bagged Tilapa, they have good frozen fish at good prices. The Mahi-Mahi and Ahi Tuna are two really good options. However, the salmon left a lot to be desired. First of all, the thawed fillets were really flat as compared to what you would buy fresh from the store. Also the texture of the fish was different and it didn't appear to be as solid, I guess, as fresh fish. And the Target salmon had a few bones in it, which is totally not desirable. So all in all, that was a really unfortunate purchase. The fish played a large part in the demise of this dish.

Salmon with Snap Peas, Yellow Peppers and Dill-Pistachio Pistou

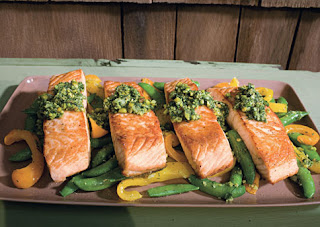
What it looked like in the magazine

Salmon with Snap Peas, Yellow Peppers and Dill-Pistachio Pistou

What it looked like on our plate


After it was all cooked and plated up, it really looked nice. However, it didn't taste nice. The Husband and I both realized it after the first bite. We kind of looked at each other like, "Who is going to be the first person to say they don't like it?" I don't recall which one of us spoke up first, but it didn't matter. The feelings about this dinner were the same across the board. We won't be cooking this again, and we learned a tough lesson about food that looks good in a picture that doesn't transfer well to the plate.

Balsamic Roasted New Potatoes

My store recently started carrying little bags of Dole Easy Steamer™ Red Potatoes. They're as handy as can be! The bag has small perforations and is designed to toss right into the microwave to steam the potatoes right in the bag. Or, as you can cut the bag open and do them up individually or however you like.


Balsamic Roasted New Potatoes

Prep: 10 min. Bake: 45 min.
Makes 6 servings

Ingredients
2 teaspoons olive oil
2 teaspoons minced garlic
1 teaspoon chopped fresh thyme
1/2 teaspoon kosher salt
1/4 teaspoon pepper
2 pounds small new potatoes, quartered
3 tablespoons balsamic vinegar, divided
Vegetable cooking spray

1. Stir together first 5 ingredients in a large bowl or large zip-top plastic bag; add potatoes. Drizzle with 2 Tbsp. balsamic vinegar, and stir or shake well to coat. Arrange potatoes in an aluminum foil-lined jelly-roll pan coated with cooking spray.

2. Bake, uncovered, at 450° for 45 minutes or until potatoes are tender, stirring once. Drizzle with remaining 1 Tbsp. vinegar, and toss well. Serve immediately.

This makes a great side dish. The prep time is fast and you can put them in the oven before anything else starts cooking, and everything should end up being done all at once. This is a very simple recipe. I double-ditto the note about putting aluminum foil on the pan you use because potato starch is hard to scrape off if any of it burns. And speaking of burning, mine did just a little. My oven is perhaps the farthest thing from precise when it comes to the temperature settings, but at 45 minutes I was close to having little potato-flavored briquettes.

Balsamic Roasted New Potatoes


I halved this recipe and threw in some fresh herbs and extra garlic. I'm wary about using too much balsamic, but this could have used just a slight bit more than what it calls for. I would also stir them more than once, just to make sure they don't start sticking to the foil. Adding some more balsamic at the end is a good kick, too. This was a good little side item for an easy weekday dinner.

Lasagna

Albert Einstein once said, “The definition of insanity is doing the same thing over and over again and expecting different results”. Well, I guess this qualifies me as insane. But this time, I beat Einstein and I got the different results I have been seeking since the beginning of lasagna-making time.

Lasagna

1 package lasagna noodles
1 pound ground beef
3 C spaghetti sauce
1 ½ C water
½ C Parmesan cheese
1/4C chopped parsley
½ t salt
2 C mozzarella cheese
15 oz ricotta
2 eggs
¼ t pepper

Heat oven to 350. In a three quart saucepan, brown meat. Add spaghetti sauce and water, simmer 10 minutes. In a bowl, stir together ricotta, half of the mozzarella, Parmesan, eggs, parsley, salt and pepper. Pour about one cup sauce on the bottom of a 13x9 inch dish. Arrange three uncooked pasta pieces over sauce, cover with about 1 cup of sauce. Spread half of the cheese filling over the sauce. Repeat layers of lasagna noodles, sauce and cheese filling. Top with a layer of noodles and remaining sauce; sprinkle with remaining mozzarella. Cover with foil. Bake 45 minutes. Remove foil, bake an additional 15 minutes. Let stand 10-15 minutes before serving. 10-12 servings.


I’ve had this recipe for a few years now. The very first time I made it, the dish turned out great. With that success under my belt, I gave it another try a few months later. The result was a colossal failure. It was way too watery and it absolutely fell apart when you cut into it, just totally inedible. I was shocked and dismayed, but I persevered and tried again. Another disaster. By now the husband is questioning my sanity. Tried again, despite his pleas to never go near the recipe again. Another watery disaster. Completely defeated, I shelved the recipe indefinitely and satiated my lasagna cravings by ordering the dish at restaurants where trained professionals could create the pasta/meat/cheese masterpiece that I was destined to never produce.

So when I was compiling the list of recipes for this project, I found my long lost lasagna recipe and decided to give it another try. I’ve listed the ingredients above just the way the original recipe was written, and when I took a second look at the ingredient list I suddenly understood why my lasagna recipe was lacking. The whole problem was that its cup runneth over – this time with water. The recipe calls for 1 ½ cups of water to mix in with the sauce! It struck me that this was the reason for the problems. Sure you use uncooked noodles in the recipe, but there is no way this much water is required to ensure they are fully cooked and pliable when everything comes out of the oven. So I scrapped the water and voila – a lasagna that is neither watery nor dry and noodles that are completely cooked.


As usual, I made a few changes. I didn’t have any ground beef on hand so I didn’t use any. Meatless lasagna is just as good as the alternative. I also halved the recipe since I am just cooking for myself, and I added feta cheese to the ricotta mixture. The flavor of the feta really didn’t come through all that much, as I didn’t use a whole lot. I also used my fresh herbs from my little herb garden – parsley and oregano.


Lasagna


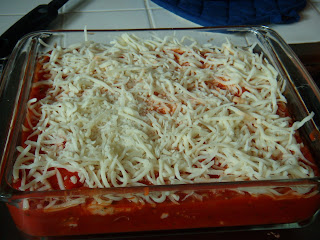
Here’s a tip – the recipe calls for a piece of aluminum foil to cover the dish before it goes into the oven. In my case, the fully assembled lasagna came up to the very top of the dish, including the mozzarella cheese, so in order to keep the cheese from sticking to the aluminum foil I sprayed the underside of the foil with a little Pam, and then put the foil down on top of the dish. That way when you take the foil off after it’s been cooking for 45 minutes, you don’t also pull all the cheese off with it. You’re welcome.


When I checked it after 45 minutes of cooking, I stuck a fork in various parts to check the doneness of the noodles. They were still kind of resistant, and I immediately regretted not adding just a little water to the sauce mix. But it was way too late for that now, so I put it back in the oven for the required 15 minutes and crossed my fingers. When it came out, the sauce was bubbling like a pent up volcano and the cheese had a nice browning around the edges. I let it cool for a few minutes and then cut a slice, noticing the noodles had definitely softened up in that last 15 minutes. Thank goodness.

Lasagna


The taste was good, but not earth shattering. It tasted like lasagna, and it was better than some places I’ve eaten lasagna as of late. I would cook it again. But the main thing is that it actually turned out well and was distinguishable as lasagna, not a watery mess. Huge accomplishment.