Friday, April 24, 2009

Extra Recipe #2 - Savory Seafood Penne

I get recipes from a lot of different places. In fact, to compile the original list of recipes for this blog I searched far and wide on the 'Net to look for new and interesting foods to cook. You just never know what's out there. The Husband's healthy eating quest has now added Men's Health magazine to our list of recipe archives. Everything we've eaten has turned out really well, and I have decided there is one single solitary reason for this: the recipes are made for dudes, by dudes. Mario Batali and Wolfgang Puck aside, most guys don't do much cooking. That either resides with their female counterpart if they're married or co-habitating, or they subsist on take-out and mom's leftovers. A man's crowning achievement in the kitchen sometimes results in a pile of Velveeta nachos with a jalapeno garnish. He's overjoyed at what he has accomplished while you, his dutiful wife/girlfriend/women of his harem, are aghast that one would consider routinely defiling their body with such a greasy mess and angry that dinner plans now most certainly do not include a romantic trip to Chez Frou Frou.

Oh, who am I kidding. I love nachos. Furthermore, that was a gross generalization of men which is unfair considering the Husband's kitchen ability. I can entrust him with just about anything in the kitchen and he can whip it up.

So what I'm saying is that Men's Health almost has to make their recipes fool proof for those men out there who don't know the difference between a rolling pin and hole in the ground. And the hilarious thing about this magazine is that they even include pictures of the ingredients! When it says, "1 cup chopped tomatoes," you will see a picture of a tomato right above that instruction. Same for shrimp, pesto, Gorgonzola, and spinach, which all go into this recipe.


Savory Seafood Penne

2 oz Barilla Plus penne pasta
14 medium precooked, peeled shrimp
2 tbsp crumbled Gorgonzola cheese
3 cups chopped baby spinach
1 tomato, chopped
2 tbsp chopped walnuts
3 tbsp ready-made pesto

Directions
1.If you're using frozen shrimp, defrost them by running warm water over them. Cook the pasta according to package directions; drain and transfer it to a large bowl. Add the shrimp, cheese, spinach, tomato, walnuts, and pesto, stirring well to help wilt the spinach and mix in the pesto.


And that is all there is to it! Boil the pasta and then throw everything in a big bowl together. Can't be any more straightforward than that - love it! And it turned out really well. A few things I did differently: I made my own pesto when it calls for jarred stuff. I really prefer to know exactly what goes into my pesto - basil, pine nuts, parm, garlic, olive oil - and what I make probably has less fat than store bought pesto. Also, shocker, but I eyeballed a lot of the ingredients. I didn't exactly measure out the cheese or the spinach or the pesto. Don't act like you're surprised. If you've read any of my other posts you know that's pretty much common place for me. Finally, there is no mention of par boiling the shrimp. It calls for precooked, frozen shrimp, which is what I used, but I still wanted mine to have a little more doneness to them, and I didn't trust the hot pasta to cook the shrimp enough to my liking. So when I drained the pasta, I reserved the pasta water and dropped the thawed shrimp in there for about two minutes, stirring often. They pinked up and curled so I knew they were done. Throw it all into a bowl, toss well, and voila.

Savory Seafood Penne


I've been pretty impressed with the recipes that have come from Men's Health magazine. I'll try to post some in the near future. If this streak continues, they'll have a better succession rate than Southern Living's recipes.

Extra Recipe #1 - Whole Wheat Bread

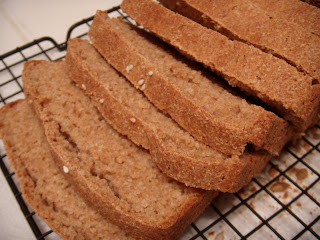
As part of the healthy eating we've been doing, we are only eating whole wheat/whole grain bread. It's healthier and, I think, tastier than white bread. White bread is all the Husband and I ate when we were kids - but didn't everyone? There may be some crunchy granola kids out there whose parents only fed them organic soy beans and tofu smoothies, but not us. We ate white bread and we loved it. We had no idea it wasn't the best thing for you to do, like riding on the handlebars of your friend's bike while not wearing a helmet and then getting scratched and scraped all over when she crashed into a blackberry bush. But anyway, we ate white bread and did crazy things and we all survived.


But now we see all of these healthy foods come out with a huge emphasis on whole grains and how they're so much better for your body. And something I don't understand is that whole grains are the original form of these little buggers that haven't been refined. Once the grains are refined, they're used for white bread. So why did everyone go through all that trouble to remove the husks and refine these grains to turn them into white bread? Why weren't they just left in their original form? It would have been much less work.


So, armed with this information we are now eating whole wheat/grain breads. They're a little expensive at about $3.50/loaf and the loaves are smaller than what you'll get for a loaf of white. We were in a new Kroger in town recently and found this brand of flour:


First of all, it says organic - the magic word that makes everything healthier, right? Ehh, not so much, but this isn't a post about organic vs. non-organic food. Anyway, this whole wheat flour sounded like the perfect excuse to make my own bread. Plus, there was a bread recipe on the package which was reason enough to make it. Recipe to come soon.


Whole Wheat Bread


Whole Wheat Bread


The recipe indicated it would be about two hours to make the bread from beginning to end. This was somewhat bad timing because I didn't begin this process until about 7:45pm, but I figured 'what the heck.' This dough called for yeast, which was something I haven't used in a while when I make bread. I've been using a bottle of light beer for the yeast, which actually really works well. Corona has been my beer of choice. The only problem with using beer as yeast is that the bread really develops that yeasty beer taste after a few days. You have to eat it quickly or it will start to ferment. You don't want that.


The dough went into the oiled pan and as I searched in vain for a warm place in our drafty positively air tight, lovely 75-year old house, I suddenly remembered our pseudo laundry room right off of the kitchen. I plopped the bread pan on top of the dryer, laid a damp cloth over the bread, set the dryer for 40 minutes, and went off to watch TV. Foolproof, right? Well, the dough did rise but not quite enough. The recipe called for it to double and it was probably another 40 minutes from completely being doubled, but at this point it was approaching 9:30 and I knew it still had 45-50 minutes to bake. That was probably the downfall of this whole experience - the fact that it didn't rise all the way. Must be a better steward of time next time I do this.


I also put some sesame and sunflower seeds on top of the dough before it went in the oven to emulate the store bought brands. Next time I may try to bake those into the bread because when it came out of the oven, the seeds and nuts hadn't adhered at all. When I inverted the bread onto the cooling rack, all of the seeds and nuts fell off onto the counter top. Lesson learned. It absolutely smelled heavenly, though! I immediately cut it into slices to let the heat escape so I could store it and get to bed - it's about 10:30pm by now and I'm fading fast. The Husband worked late and had just arrived home when the bread came out, so he was the first to try a piece. It was good but kind of dense. The full rise definitely would have prevented that.


I do want to try to make this bread again, though. I'll do a few things differently: full rise, seeds and nuts in the bread, and mix in less flour even if it's really sticky. It called for an initial 2 cups of flour but up to 2-3 more to add in to the final dough. I used a little more than 5 because the kneading process was becoming a sticky mound on my cutting board. Thank heavens for my bench scraper or I would have been totally lost. This was a good first attempt and I'm going to give it another shot.

Thursday, April 2, 2009

Spaghetti with Tomatoes, Basil, Olives, and Fresh Mozzarella

This dish made me think of summer. It's light, doesn't require lots of cooking time and would be perfect with fresh ingredients from the farmer's market. It was really a hit. We did add a few extra items, which I'll get to, but the recipe in its original state would be so good for a light, summer dinner.


Spaghetti with Tomatoes, Basil, Olives, and Fresh Mozzarella

Ingredients
2 pounds vine-ripened tomatoes (about 6), chopped
3/4 pound salted fresh mozzarella, cut into 1/4-inch cubes, at room temperature
1 1/4 cups chopped fresh basil
1/2 cup halved and pitted black olives
4 teaspoons balsamic vinegar
1 1/4 teaspoons salt
1/2 teaspoon fresh-ground black pepper
1 pound spaghetti
1/2 cup olive oil
3 cloves garlic, minced

Directions
In a large glass or stainless-steel bowl, combine the chopped tomatoes with the mozzarella, basil, olives, balsamic vinegar, salt, and pepper.

In a large pot of boiling, salted water, cook the spaghetti until just done, about 12 minutes. Drain, add to the tomato mixture, and toss.

Heat the oil in a small frying pan over moderately low heat. Add the garlic and cook, stirring, for 1 minute. Pour the oil over the pasta and toss again.

Like I mentioned above, we added a few extra ingredients to increase the bulk and protein in this dish. First we did whole wheat pasta to get the good, healthy grains. We added some shrimp, thawed from the freezer, and some sliced and pan-cooked prosciutto. Maybe we're just conditioned to seeing large portions, but I don't think the original recipe would have filled us up for dinner. Maybe I'm wrong. Either way, the extra goodies tasted great and were a nice addition.


Tomato, mozzarella and basil mixture

Tomato, mozzarella and basil mixture.


For the prosciutto, I found it sliced in the local grocery store. I chopped up two thin slices and cook them in a pan with a little olive oil along with the oil and garlic in the last step of the directions. Oh, and the olive oil. We halved this recipe, and even then we most certainly didn't use the whole amount of olive oil to pour over the pasta in the last step. That's a lot of olive oil, and I can understand using that if you need to slick up your insides to get rid of a hairball or something, but I don't think normal people (myself and the Husband) need that much oil floating around in our dinners. We did a fraction of that, and while we didn't have much of a sauce, it still was fine.


Another thing we did was attempt to warm the pasta for a few minutes before we ate. We drained the pasta, added the tomato mixture, along with the mozzarella, and put it on low heat while the prosciutto-garlic mixture cooked. In retrospect, we should have reconsidered what happens to cheese when you heat it up - it melts. And gets really stringy, mozzarella especially. So when we removed it from the heat we did have hot pasta, but we also had a mass of melted cheese goo in the bottom of the pan. Not quite what was supposed to happen. Maybe next time we'll just prep everything faster.


But even with the melty cheese, it was really good. See for yourself.

Spaghetti with Tomatoes, Basil, Olives, and Fresh Mozzarella

Finished product, including shrimp and prosciutto.

Wednesday, March 25, 2009

Shrimp and Grits

Woo-hoo! Shrimp out the wazoo for us lately. I buy it on sale and I always have a bag or two in the freezer of peeled, deveined, cooked, frozen shrimp. Thaw it out in the sink under running water for a few minutes and you can do a million things with it, including this recipe. This was kind of a cheating recipe for me since it's not a new meal, but it's still worth adding. I got this from a Southern Living magazine a few years ago and it's absolutely incredible. This dish also comes together fairly quickly. It's very indulgent with the cheese, bacon and bacon fat, but it's so worth it.


Shrimp and Grits

Prep: 15 minutes
Cook: 30 minutes
Serves: 4

1.5 C quick cooking grits
¼ C shredded sharp cheddar cheese
1.5 T butter
4 T hot sauce, divided
1 pound unpeeled, medium-size fresh shrimp
¼ t salt
2 bacon slices
½ C chopped green onions
1 T fresh lemon juice
1 T chopped flat leaf parsley

Cook grits according to package directions. Remove from heat, and stir in cheese, butter and three tablespoons hot sauce until melted and blended. Cover and set aside.


Peel shrimp and devein (unnecessary if you're using frozen shrimp). Toss with salt and remaining 1 tablespoon hot sauce.

Cook bacon in a large skillet over medium-high heat 5 to 7 minutes or until crisp; remove bacon, reserving drippings in skillet. Crumble bacon. Add shrimp and green onions to skillet, and sauce 3 minutes or just until shrimp turn pink. Stir in lemon juice.

Spoon grits onto a serving platter; top evenly with shrimp mixture and sprinkle with parsley and bacon. Serve with additional hot sauce, if desired.


Yumma. A few things I change - I cook about a quarter of the amount of grits called for. I use Quaker plain grits in the cardboard canister and I split the difference between the two serving and four serving amounts. Two isn't nearly enough and four will feed a small army. The three servings gives us plenty for one serving each and a little left over to eat out of the bottom of the pan if you're still yearning for more cheesy goodness. Also, I add more cheese, salt, hot sauce, pepper and garlic than the recipe calls for. I like all of those things, so I add more of them. Just my preference.


As far as cooking the bacon and reserving the fat, I can't really bring myself to do it. I cooked it that way the first time I made this dish and while it was delicious, I usually stay far away from using actual fat in my cooking. Instead, I cook the bacon in the microwave and either A) reserve a tiny bit of the drippings to put in the pan for the shrimp, or B) cook the shrimp in olive oil. You can do either. I think they taste the same. Oh, and I also cook more bacon because, well, bacon is heavenly.

Shrimp and Grits


Cheese, bacon and shrimp. The Holy Trinity.

And there you go! This really is something I only cook occasionally, especially now that the husband is back on the health food band wagon. It's a nice treat, and a tasty one at that.

Baked Shrimp with Feta

For a quick dinner in, nothing beats this recipe. It comes together in almost no time, you use minimal ingredients and the taste is really fresh and simple. Plus, in the summer you can sub fresh tomatoes for the canned variety and the taste is completely different. It's lighter and has less sodium, fat and calories (I imagine) than using tomatoes from a can.


Baked Shrimp with Feta

1 tablespoon olive oil
3/4 teaspoon dried oregano
1/2 teaspoon salt
1/4 teaspoon crushed red pepper
1 lb. med. shrimp, peeled and deveined
3 garlic cloves, minced
Cooking Spray
1/2 cup dry white wine
3 cups diced plum tomatoes
3/4 cup finely crumbled feta
4 cup hot cooked angel hair pasta
1/4 cup minced fresh parsley


Preheat oven to 350. Heat oil in large non-stick skillet over medium high heat. Add oregano through garlic. Saute 3 min. Spoon shrimp mixture into 11x7 baking dish-coating w/ cooking spray. Add wine to skillet-cook until reduced to 1/4 cup. Stir in tomatoes and pour over shrimp. Sprinkle w/ cheese and bake 10 min. Serve over angel hair pasta and sprinkle w/ parsley.


This is an easy dish with not many steps. Plus, once you get out the white wine for deglazing you may as well pour some for yourself. I add more feta than what it calls for because I love that stuff. Also, I eyeball the shrimp and spices (are you noticing a theme here with all of my recipes?). It seriously only takes a max of ten minutes to get this from the pan to the oven. While the shrimp mixture is in the oven, you boil the pasta and drain it just as the shrimp is ready.


Going into the oven

Going into the oven


While the shrimp mixture bakes, it creates this delicious reduction in the bottom of the dish that really adds flavor to the pasta, because by itself it can be a little bland. A little more wine and cheese and tomatoes can easily fix that.


Baked Shrimp with Feta

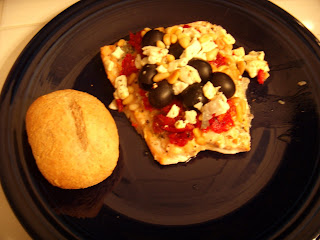
All plated up!


The husband is a big proponent of this recipe and again, it is really fast to put together. I almost always have the items on hand that it takes to make it and it's a good, light dish for the summer.

Monday, February 16, 2009

Masa Griddle Cakes with Poblanos and Goat Cheese

"Pretty freaking good!"

With those words, I have reached the summit. The husband is completely on board with this cooking thing and those three little words sealed the deal. Yes!


Masa Griddle Cakes with Poblanos and Goat Cheese

TOTAL TIME: 1 HR
Ingredients
1 1/4 cups masa harina
1 cup cold water
1/2 teaspoon salt
6 poblano chiles
1/4 cup pure olive oil, plus more for frying
1 onion, finely chopped
Pinch of dried oregano, crumbled
Salt and freshly ground pepper
1 garlic clove, minced
One 15-ounce can black beans, drained
4 ounces chilled fresh goat cheese, crumbled

Directions
In a medium bowl, stir the masa with the water and the salt until a soft dough forms. Divide the dough into 12 balls and flatten them into 2-inch cakes. Transfer to a plastic wrap-lined baking sheet and cover with plastic wrap. Roast the poblanos directly over a gas flame or under a broiler, turning, until charred all over. Transfer to a bowl, cover with plastic wrap and let stand for 10 minutes. Peel, core and seed the chiles, then cut them into thin strips.
In a medium skillet, heat 2 tablespoons of the olive oil until shimmering. Add half of the onion and cook over moderate heat until softened, about 7 minutes. Add the poblano strips and oregano and cook for 2 minutes, stirring occasionally. Season with salt and pepper and keep warm. In a medium saucepan, heat the remaining 2 tablespoons of olive oil until shimmering. Add the garlic and the remaining onion and cook over moderate heat until softened, about 7 minutes. Add the beans and cook, coarsely mashing them with a potato masher just until creamy, about 2 minutes. Season with salt and pepper and keep warm.

Heat a griddle. When it is hot, generously brush it with oil and add the masa cakes. Cook over moderately high heat, turning once or twice, until they are golden and crisp, about 4 minutes. Transfer the cakes to a platter and top each with a dollop of the beans and a mound of the poblano mixture. Garnish with the goat cheese and season with salt and pepper. Serve right away.


Because these appeared to be little side dishes or appetizers, we cooked steaks to accompany them. That make it a pretty good meal. I halved this recipe and came up with five little masa cakes. And this masa stuff is interesting. It's corn flour, not corn meal like this Southern girl is used to. It's for tortillas, not cornbread. But it mixed up into this crumbly dough that packed well and flattened just fine. Kind of like slightly wet sand at the beach.


One thing that needs to be added next time is more heat - and by heat, I mean Tabasco sauce. We determined the beans could benefit the most from added heat, and the poblanos (of which I used two) didn't seem to add any heat at all. They rank just above "complete wuss" on the Scoville scale. The goat cheese is awesome, adding a dash of tangy goodness to the whole mix. I didn't have a griddle for the masa cakes, so I just used a pan brushed with oil. They probably could have gone for a little longer in order to achieve the optimum crispiness, but our steaks were ready and we didn't want them to be cold.


Masa Griddle Cakes with Poblanos and Goat Cheese

Finished product, all five of them


Masa Griddle Cakes with Poblanos and Goat Cheese

A close up - you can see the way it's all piled onto the cakes


This is a dish I would make again with a few adjustments. More heat is needed, plus I have to figure out a way to keep the cakes warm, specifically the beans. The beans and poblano/onion mixture cooled down very quickly after it all came off the stove. I even nuked the beans and poblanos before I plated everything and it still cooled down a good bit. So that needs to be overcome, but otherwise it's "pretty freaking good."

Wednesday, February 11, 2009

Mediterranean Salmon

It's always nice to throw some fish into the mix. It's a good, light meal that usually doesn't require much prep, and even though it seems expensive at the checkout line it much less expensive than what you'd pay for a comparable meal in a restaurant. Target even has some good frozen fish - ahi tuna, mahi mahi and salmon come to mind.


Mediterranean Salmon

Prep: 20 min.
Bake: 20 min. If your sun-dried tomatoes are packed in oil, be sure to drain and
pat dry with a paper towel before using.

Makes 4 servings

Ingredients
4 (6-oz.) salmon fillets
3/4 teaspoon lemon pepper
3/4 teaspoon dried dill weed
1/4 teaspoon salt
1/2 cup coarsely chopped sun-dried tomatoes
1 (2.25-oz.) can sliced ripe black olives, drained
2 ounces reduced-fat crumbled feta cheese with basil and tomatoes
1/4 cup pine nuts, toasted

1. Place each salmon fillet on a 16- x 12-inch piece of heavy-duty aluminum foil. Sprinkle fillets evenly with lemon pepper, dill, and salt. Top fillets evenly with tomatoes and next 3 ingredients. Fold long sides of foil over fillets; roll up short sides of foil to seal. Place foil packets, seam sides up, on a baking sheet.

2. Bake at 400° for 18 to 20 minutes or until fish flakes with a fork.


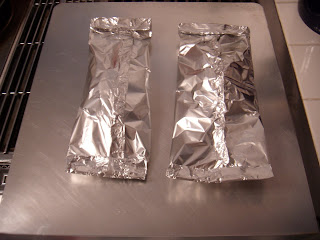
This was incredibly easy to put together. Put the fish on some aluminum foil, throw ingredients on it, fold it up and stick it in the oven. Easy as that. Minimal cleanup. Pretty doggone good.


Mediterranean Salmon

Raw fish ready to go in the oven. The Husband likes olives; I don't


Mediterranean Salmon


Packed up in foil


Mediterranean Salmon


Finished product. Yumm-o.

Tuesday, February 10, 2009

Beer Cheese Soup

There are a few truths that we hold fast to in life:
  1. When life gives you lemons, make lemonade.
  2. The only sure things are death and taxes.
  3. If you see this Beer Cheese Soup in a dark alley, train your sights and shoot to kill, leaving no survivors.
Beer Cheese Soup

1 T butter
½ C chopped onion
½ t minced garlic
1 t Worcestershire sauce
1 (12 fl oz) can or bottle light beer
1 (14.5 oz) can chicken broth
3 T cornstarch
2 C half and half
2 C shredded sharp Cheddar cheese

Melt the butter in a 4 ½ quart soup pot over medium heat. Add the onion, garlic and Worcestershire sauce and stir well. Add the beer and raise the heat to high and boil for 3 minutes to evaporate the alcohol. Add the chicken broth and bring the soup
back up to a boil. Lower the heat to medium-low and simmer.

Combine the cornstarch with 3 tablespoons water and stir until smooth. Set aside.

Add the half and half and shredded cheese to the soup. Stir constantly until the cheese melts. Then stir in the cornstarch mixture. Stir constantly until the soup is thick, about 2 minutes.

When I got home last night, I was pleasantly surprised to see the Husband was already in the kitchen chopping onions, measuring butter and pouring beer. He looked so happy and I was forever grateful for him starting dinner. I even went to a great bakery in town to pick up some small bread bowls to put the soup in. I was prepared for this to be a feast!

Boy, was I wrong.

The soup was thin, grainy, totally uncheesy and all I tasted was onion. It also never really thickened up. I know we followed the recipe to a tee. And then when I pulled the bread bowls out of the bag, there was a trace of mold on the bottom of the loaves. I had to cut off the bottom crust, therefore leaving no reliable barrier from keeping the soup from leaking out the bottom. Good thing the soup never even left the pan, huh? We tried a few spoonfuls each, added Tabasco sauce and more cheese and debated adding more ingredients before deciding there was no use in wasting more cheese/half and half/Tabasco if there was no guarantee those items would make the soup palatable. So we made burritos instead.

And to top it all off, soup doesn't photograph well. And yes I'm sure it has nothing to do with my photographic skills - what are you trying to say? At any rate, I took that as a sign that the soup must be evil and wouldn't stand for its picture to be taken.

My rating - this soup was a colossal failure. But I still love the Husband for trying and I know this wasn't operator error. The recipe just sucked.

Monday, February 9, 2009

Potato and Ricotta Gnocchi with Bolognese Sauce

This was another one of those "What the hell am I thinking" kind of recipes. It looks very intimidating, it's a totally unfamiliar cooking concept, and it requires a certain exactness in measurements that I simply don't seem to possess. But yet again, here I am staring down a recipe I am determined to make and I am not about to let anything stop me.


Potato and Ricotta Gnocchi with Bolognese Sauce
8 restaurant servings

For gnocchi:
• 1 pound Yukon Gold potatoes
• 1 pound ricotta cheese
• 5 egg yolks
• 1 tablespoon kosher salt
• 6 ounces all-purpose flour – by weight – plus more for dusting
• 1 1/2 tablespoons grated Parmesan cheese

For sauce:
• 1 tablespoon olive oil
• 1/2 onion, small dice
• 2 stalks celery, small dice
• 1 carrot, small dice
• 1 bay leaf
• 2 pounds ground beef
• 2 pounds ground pork
• 1/4 cup red wine
• 1/2 cup chicken broth
• 1 tablespoon kosher salt
• 1/2 teaspoon black pepper
• 1 cup tomato puree
• 1 tablespoon tomato paste

DIRECTIONS
For sauce:
Heat olive oil in large sauté pan until it just begins to smoke. Add pork and beef and sauté until golden brown and cooked through. Break large chunks with a wooden spoon. Remove cooked meat with a slotted spoon and pour off all but 1 tablespoon of liquid left behind.

Return pan to heat and when it just begins to smoke add vegetables and sauté until golden brown. Remove vegetables from pan and pour off remaining liquid.

Return pan to heat and add red wine, scraping bits from the bottom of the pan. Continue cooking wine until it reduces to a syrupy consistency.

Add chicken stock, tomato sauce, and tomato paste to pan and bring to a simmer. Add meat and vegetables and bay leaf to pan and return to a simmer. Reduce heat to medium and let mixture slowly simmer for approximately 30 minutes, or until liquid has reduced to a sauce-like consistency. Season with salt and black pepper to taste.

For gnocchi:
Peel the potatoes and simmer until they can be easily pierced with a small knife. Remove the potatoes from water and let them cool for 5 minutes. While still warm, pass the potatoes through a ricer and let cool for 5 minutes more.

Meanwhile, in a medium-size bowl, mix ricotta, egg yolks, salt, pepper and grated Parmesan. (If the ricotta is too soft or watery, line a colander with cheesecloth and set it over a bowl. Set the bowl in the refrigerator and let it drain for 1 hour.)

Add the potato to the ricotta mixture and gently mix by hand. Be careful not to overwork. Add the flour in two portions, mixing by hand and being careful not to overwork. Let the dough rest for 1 hour before portioning.

When ready, dust a clean work surface with flour and divide the dough into 4 portions. Gently roll the dough from the center outwards, stretching to create one long, ropelike piece. The dough should be about 1/2- to 3/4-inch thick.

With a bench scraper, cut the gnocchi into individual pieces approximately 1 inch long. Remove gnocchi to a baking tray dusted with flour. To cook, bring 2 quarts water to a boil and add 2 tablespoons kosher salt. Add 8 to 10 pieces of gnocchi and cook until all the gnocchi begin to float. Warm 3 to 4 ounces Bolognese sauce in a sauté pan.

Quickly remove from boiling water and add gnocchi to the pan with warm Bolognese sauce. Toss to coat and serve immediately.


Potato and Ricotta Gnocchi with Bolognese Sauce

Finished product


Just, wow. I had no idea I could cook something like this. The pot stickers were awe-inspiring enough, but this was just off the charts. From start to finish, it took about two hours to complete the meal, from the gnocchi dough having to sit for an hour to putting the sauce together. But man, it was worth it! For starters, I am never purchasing store-bought gnocchi ever again. Ever. I mean it. This was kind of time consuming, but the taste is one meeelion times better than that Target brand stuff I bought. Light, fluffy, doughy - all good things. I didn't have a gnocchi board:

... but I managed fine. These are mainly used to make ridges to trap the sauce, but this sauce was so meaty and had so little liquid that it couldn't help but cling to the gnocchi.

And the sauce - wow. First of all, I halved the amount of beef and pork and kept the other measurements for the sauce pretty much the same. I added more of the liquid, like chicken broth, tomato sauce/puree, red wine and tomato paste. However, I simmered it on the stove without a lid so all of that liquid evaporated and we were left with just meat. We got it a little more soupy right before we served it, but it tasted wonderful.

I also made the full amount of gnocchi and froze the extras before I cooked them. When cooking the gnocchi, there was no time table on how long to let them cook before they were ready. I found that it only took about four minutes before they started to rise to the top of the water. I wanted to keep cooking them for fear of them tasting under done, but they were so good.

This is another winner, and it will forever have a place in my recipe box. This would be a good company recipe to make for a dinner party or another big event. The trick would be getting the gnocchi to cook and keep them warm until everyone has a serving, but we covered the individual bowls with foil and that did the trick.

Tip: To freeze leftover gnocchi, place them individually on a large cookie sheet and place in the freezer. When they harden, put them in a Ziploc bag and seal tight. If you just throw them in a bag all together, they'll freeze into a gnocchi blob and will be very hard to thaw and cook properly. They thawed nicely in the bag overnight in the fridge.

Update: A week or two later, I thawed the leftover frozen gnocchi to have for another dinner. The gnocchi held their shape, but they didn't taste as good as when they were fresh. They also seemed a bit more doughy than when they were fresh. They weren't bad, but they're better the first time around.

Crispy Pork and Kimchi Pot Stickers

When I was picking out recipes for this quest, I figured I would have a mix of easy recipes and more complicated recipes. This fell into the "more complicated" category. Just looking at the kimchi and unseasoned rice vinegar made me twitch, thinking I would have to search the ends of the earth to find these items. Once again, imagine my surprise when I found these items at our local Big Box retailer. Oh unnamed massive retailer, you saved me once again but that does not change my distaste for you.


Crispy Pork and Kimchi Pot Stickers

TOTAL TIME: 1 HR
SERVINGS: makes about 36 dumplings
Ingredients
SAUCE
1 teaspoon sesame seeds
1/3 cup soy sauce
1/4 cup unseasoned rice vinegar
2 tablespoons water
1 garlic clove, minced
1 scallion, thinly sliced
DUMPLINGS
1/2 pound ground pork
1/2 pound kimchi (Korean pickled cabbage), drained and finely chopped
4 scallions, green parts only, thinly sliced
1 large egg, beaten
2 teaspoons cornstarch
1/2 tablespoon sugar
1/2 tablespoon soy sauce
1/2 teaspoon kosher salt
1/4 teaspoon freshly ground pepper
36 gyoza wrappers
2 tablespoons vegetable oil
1 cup water
Directions
MAKE THE SAUCE: In a small skillet, toast the sesame seeds over moderately high heat for 30 seconds, shaking the pan, until lightly browned. In a small bowl, stir
the soy sauce with the vinegar, water, garlic, scallion and toasted sesame seeds.

1. MAKE THE DUMPLINGS: Line a large baking sheet with parchment paper. In a large bowl, combine the ground pork with the kimchi, scallions, egg, cornstarch, sugar, soy sauce, salt and pepper. Using your hands, mix the dumpling ingredients thoroughly.

2. Place 4 gyoza wrappers on a work surface; keep the rest covered with plastic wrap. Lightly moisten the edges of the gyoza wrappers with water. Place a level tablespoon of the ground pork and kimchi filling on one side of each wrapper and fold in half to form half-moons. Press the edges of the wrapper firmly to seal, making pleats for decoration. Lift each dumpling by the pleated edge, transfer it to the baking sheet and press down lightly to flatten the bottom; the dumpling should be standing with the pleat side up on the baking sheet. Repeat with the remaining gyoza wrappers and pork and kimchi filling.

3. In a large, nonstick skillet, heat 1 tablespoon of the oil. Add half of the pot stickers to the skillet, flattened side down. Pour in 1/2 cup of the water, cover and cook over moderately high heat until the water has evaporated, the filling is cooked through and the bottoms are browned, 8 to 10 minutes. Transfer to a serving platter and keep warm. Wipe out the skillet and repeat with the remaining oil, pot stickers and water. Serve with the dipping sauce on the side.


Crispy Pork and Kimchi Pot Stickers

Freshly formed pot stickers


Crispy Pork and Kimchi Pot Stickers

Blurry, cooked pot stickers


Crispy Pork and Kimchi Pot Stickers

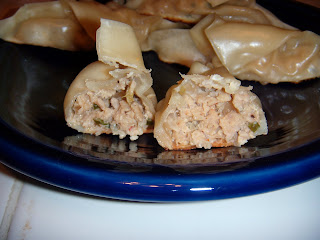
Yummy pork filling


The Husband made the dipping sauce while I mixed together the pork and kimchi filling. Now let me say something about this kimchi. It smells just like you would imagine - like pickled, spicy cabbage. Oof. And boy, does that stuff stain. And since the recipe calls for such a small amount, I still have almost a whole jar of this stuff still left to eat. I also have lots of those wrappers left, considering I halved this recipe. So it looks like we're having pot stickers again in the near future. But I completely don't mind because this meal was that good. We decided next time we would halve the recipe and add in a few pieces of sushi for each of us just to round out the meal.

I admit - I was a little afraid of this recipe. I'm now cooking for the Husband, too, and not just myself, so there is a lot more riding on my success or failure of dinner. Success - happy Husband. Failure - call Papa John's. But I can say with confidence that neither of us even considered calling the Papa once this meal was on the table. This was a total success! The dipping sauce really made the meal, and next time I may even sprinkle some of the sesame seeds onto the pot stickers before they go into the pan. We'll also add more of the kimchi since it doesn't have the kick we thought it would, and we would add hot chili flakes to the dipping sauce and maybe some chili garlic sauce to the filling.

I let them go in the pan for about nine minutes, and the bottoms had browned nicely and the pot stickers were a little chewy, but I imagine that's how they're supposed to be. They weren't inedible or anything.

Overall, this was delicious and while there is room to improve, I think these are good enough to eat as is.