Wednesday, November 25, 2009

Potato Soup

One of my favorite comfort foods is potatoes. It doesn't really matter to me how they're cooked - mashed, scalloped, baked, twice-baked, fried as pancakes - because it's going to be good no matter what. This potato soup recipe is no different. It was so good and rich and creamy. It was a total hit and really did the trick on a cold night.

Potato Soup

Serves: 8

¼ C unsalted butter
2 C chopped yellow onion
1 C chopped celery
½ t salt
¼ t cayenne
1 bay leaf
2 T chopped garlic
8 C chicken broth
2 large baking potatoes (about 2 pounds), peeled and diced
¼ C heavy cream

Melt the butter in a large, heavy pot or Dutch oven over medium-high heat. Add the onions, celery, salt and cayenne and cook, stirring, until the onions are soft and lightly golden, about 5 minutes. Add the bay leaf and garlic and cook, stirring, for 2 minutes. Add the broth and potatoes and bring to a boil. Reduce the heat to medium-low and simmer, uncovered, until the potatoes are soft, about 30 minutes.

Remove the soup from the heat. Discard the bay leaf. With a hand-held immersion blender, or in a food processor or regular blender in batches, process until smooth. Slowly add the cream and stir to blend.

To serve, ladle into soup bowls and serve hot.


Mmmmm. That's good stuff. First of all, some changes I made. The recipe calls for all of the potatoes to be processed until smooth. I prefer some chunkiness to my potato soup, so I only processed half of the soup mixture, leaving the other half with some of the potato pieces intact. I also didn't add any celery because I didn't want to buy a whole thing of it and not have any other way to use it. I added a little celery seed instead. And I most certainly didn't chop two whole cups of onions. I cut a few rings of an onion and it was the perfect amount.

I also halved the recipe. For the base of the soup, it calls exclusively for chicken broth so we're talking four cups of broth. Of course, this means the soup had a very strong, slightly overpowering taste of chicken broth. I think next time I will cut the broth with some water, maybe go 3/1 or even 2/2. It just distracted from the taste of the potatoes and other ingredients. It was still good, though.

Potato Soup


I dressed the soup up with some shredded cheese and chopped parsley from my little herb garden on the porch. The soup was nice and peppery, very brothy, and had a few potato chunks. I think I will cook the potatoes for a shorter amount of time when I make this again and also puree a smaller amount of the soup. To me, it's not really potato soup unless you can see and taste the potatoes. This was incredibly good, though, and definitely fit the bill as an ideal comfort food.

Wednesday, November 11, 2009

Pear and Cranberry Turnovers

Yum! This recipe was one of the few dessert selections I chose at the beginning of this quest. I wanted something fun and different and this absolutely fits. I was really excited about using fresh cranberries in this recipe, and since it's holiday time I was able to find them easily at the store. All in all, this was pretty easy to put together.


Pear and Cranberry Turnovers

ACTIVE: 25 MIN
TOTAL TIME: 1 HR 30 MIN
SERVINGS: MAKES 8 TURNOVERS

Ingredients
2 Bosc pears (1 pound), peeled and cut into 1/2-inch dice
1/3 cup plus 1 1/2 tablespoons sugar
1 tablespoon all-purpose flour, plus more for dusting
3/4 cup fresh or frozen cranberries
Pinch each of ground cloves, cinnamon and salt
One 14-ounce package cold all-butter puff pastry
1 egg, beaten
Whipped cream or vanilla ice cream, for serving

Directions
Preheat the oven to 400°. In a medium bowl, toss the pears with 1/3 cup of the sugar, 1 tablespoon of the flour and the cranberries, cloves, cinnamon and salt.

On a lightly floured work surface, roll out the puff pastry to a 14 1/2-inch square about 1/8 inch thick. Using a sharp knife, cut the pastry into 8 squares. Spoon the pear filling onto a corner of each square, leaving a 1/2-inch border. Fold the pastry over the filling to make a triangle and firmly press the edges to seal. Crimp the edges with a fork. Prick each triangle once with the fork to allow steam to escape during baking. Transfer the turnovers to a baking sheet and refrigerate for at least 30 minutes, until chilled.

Brush the tops of the turnovers with the beaten egg and sprinkle with the remaining 1 1/2 tablespoons of sugar. Bake the turnovers for 30 minutes, until golden brown. Let the turnovers cool for at least 5 minutes. Serve with whipped cream or ice cream.


Before this recipe, I do not believe I had ever purchased a bag of fresh cranberries. I was also never a huge fan of jellied cranberry sauce when I was a kid, but someone once made some fresh cranberry sauce that was delicious. I have this weird aversion to meat and fruit combinations, so while I didn't apply said sauce to my turkey, I did taste it separately and it was really good. So from here on out, fresh cranberries are the way to go. Also, fresh cranberries aren't really something you can just eat out of the bag. Whoo-boy, those suckers are tart! I don't know what I expected when I crunched on one, but I just about turned inside out. Thankfully, cooking cranberries lessens the tart and brings in just the right amount of sweet.

With the pears peeled and cubed, cranberries washed and sugar/spices added in the bowl, it makes a whole lot of filling. The recipe calls for one sheet of pastry dough that you roll out to make it larger. My dough could have used a few more once-overs with my rolling pin because I had trouble getting eight exact squares. They were more like lopsided rectangles and the end pieces were a tad on the small side. There was some creative stretching going on to get the dough to the right size. Plus, with the unbaked cranberries and all that sugar, the filling really isn't something you can eat out of the bowl if there is still some left over. So I just added it all and really pulled that dough so it covered everything and sealed.

Pear and Cranberry Turnovers


I highly recommend putting down a sheet of parchment paper under the turnovers. As you will see in the "after" photo, the sugary sauce that results will become a little burned (or maybe it's just my oven) and will stick to your baking sheet. Parchment paper will lift right off and you can throw it away with minimal cleaning needed to your baking sheet. You also don't have to use a non-stick cooking spray with the parchment paper.

The finished product was really good, with the exception of the slightly crispy edges. The cranberries mellowed out significantly and any residual tartness was covered by the copious amounts of sugar that went into the filling. The pastry was light and flaky, and the egg wash gave it a nice sheen on top.

Pear and Cranberry Turnovers


Even with just the Husband and myself here at the house, we polished all eight of these off in short order. They're easily reheatable in the microwave and lasted about a week in the fridge. The Husband also gives his approval for these: "Oh, those are tasty." Sweet.

Thursday, November 5, 2009

Peanut Butter Granola

I figured this could be a mutli-purpose recipe that would serve both the dessert and breakfast tastes. I immediately found a breakfast option, and dessert can't be far behind.


Peanut Butter Granola

Prep: 15 minutes
Cook: 3 minutes
Bake: 20 minutes
Cool: 20 minutes

3 C uncooked oats
½ C dry-roasted peanuts
½ C sweetened flaked coconut
3 T sesame seeds
½ C creamy peanut butter
½ C firmly packed brown sugar
¼ C butter
1 T light corn syrup
¼ t salt

Preheat oven to 350˚. Toss together oats through sesame seeds. Cook peanut butter through salt in a small saucepan over medium heat 3 minutes or until smooth. Stir peanut butter mixture into oat mixture until blended. Spread mixture in a single layer on a lightly greased, aluminum foil lined 17x12 inch jelly roll pan. Bake 20 minutes or until lightly golden, stirring after 10 minutes. Transfer to wax paper and cool completely, about 20 minutes. Serve with vanilla yogurt and sliced bananas. Makes 6 cups.


Like I said, this immediately became a breakfast food. I had a recipe for a yogurt parfait that I found right around the time I decided to make the peanut butter granola, so I figured the best possible idea was to combine the two. Otherwise, I would not have had any use for the granola. It held up well when it was all being mixed together and there were even some small clumps that loosely formed. And when I spread it all out on the parchment paper, I was shocked at how much there really was. I mean, there was a ton of this stuff.


Peanut Butter Granola


But it cooked nicely, and again with my oven, I could have backed the time off by about two minutes. There was a small burned taste when it all came out of the oven, but it wasn't very strong and was easily masked by the yogurt. It's probably not substantial enough to be used as a granola-type cereal, and I guess it could be a topping for some kind of apple crisp. But for me, it worked well as a parfait. I used Yoplait Vanilla yogurt and sliced up some banana and layered it all in a glass. Perfect! And portable, too. I took some in the mornings when I left for work and I was able to sneak in a few bites at stop lights. Maybe not the safest thing to do while driving, but I was fairly responsible about it, only driving with my knees when absolutely necessary.


Peanut Butter Granola


And there you go! I'm sure there are a lot of other ways to use this granola, but the parfait was the easiest thing for me. And in the immortal words of Donkey from Shrek, "Everybody loves parfaits!"

Monday, November 2, 2009

Goat Cheese Mashed Potatoes

Come on - how can this not sound delicious? You have potatoes, you have heavy cream, you have goat cheese. Plus, this recipe came out of an Emeril Lagasse cookbook so you know it's going to be good.

Goat Cheese Mashed Potatoes

Serves: 8

4 C peeled and diced white potatoes
1 ½ t salt
¾ C heavy cream
¼ C unsalted butter
½ pound goat cheese, crumbled
1/8 t freshly ground white pepper

Combine the potatoes and 1 teaspoon of the salt in a large saucepan. Cover the potatoes with water, bring to a boil and cook over medium heat until fork tender, about 20 minutes. Drain.

Return the potatoes to the saucepan and, over low heat, stir them with a fork or wire whisk for about 2 minutes to dry them. Add the cream, butter, cheese, the white pepper and the remaining ½ teaspoon salt. Mix well. Serve hot.


I cannot tell you how much this hit the spot. I had been craving potatoes for the longest time and I couldn't wait much longer before making this. As far as the ingredients, I went pretty far off the rails this time when I was throwing it together. I didn't measure a thing, just eyeballed it, and it turned out more than fine. It was fantastic. I only had two potatoes, which didn't equal four cups of diced potatoes, so I reduced the other ingredients accordingly. I also used fat-free half and half instead of heavy cream, which didn't pose any problems. Same with the butter, goat cheese and white pepper - I just threw in however much I thought looked like a good amount. Sometimes I don't even know why I bother with a recipe.


In the "mix well" portion of the recipe, it's referring to the actual mashing of the potatoes though it's not specifically stated as such. A wonderful little tool I've found works great to mash potatoes is a pastry cutter. A blender can be too rough and a fork just doesn't do it. The pastry cutter lets you work at your own speed and determine how chunky or smooth you want the potatoes to be.


Goat Cheese Mashed Potatoes


This is the finished product. If you look closely you can see little white specs - that's the goat cheese. I'm only slightly ashamed to admit that I mostly ate this straight from the pot I cooked it in - it was that good. These were rich without being overpowering and creamy without being runny. A perfect combination.

Whole Wheat Bread, Round 3

This is my third go 'round for Whole Wheat Bread. The first attempt went really well and the bread was delicious. The second time was a disaster, though I was pretty sure I had duplicated the same recipe I used the first time. But here was the issue: I previously used Arrowhead Mills Stone Ground Whole Wheat flour which was perfect, but the second time I used another brand, Hodgson Mill. What I didn't know was that the Hodgson Mill bread was gluten free, or something similar. When I used the bread recipe on the Arrowhead Mills package, but used the Hodgson Mill flour, the result was a crumbly mess that absolutely fell apart when I sliced into it. There was no saving the bread and it was a complete waste. I couldn't figure it out until I finally looked on the side of the Hodgson Mill package at their bread recipe, which calls for wheat gluten. So this third time, I followed the recipe on the Hodgson Mill package, used the wheat gluten, and voila! Delicious bread once again.


Basic Whole Wheat Bread

2 C warm water
2 packages of yeast
3 T brown sugar
1 T Hodgson Mill Vital Wheat Gluten
3 C Hodgson Mill Whole Wheat Graham Flour
1/4 C vegetable oil
1 t salt
3 to 3 1/2 C bread flour, divided

Put water in a large bowl. Add yeast, stir to dissolve. Add brown sugar, gluten and whole wheat flour. Beat well, about 200 strokes. Let yeast develop for about 10 minutes. Add oil and salt; mix thoroughly. Add two cups of the bread flour; beat well. Work in enough of the remaining bread flour to form a soft dough.

Turn out onto a lightly floured surface and knead 6 to 8 minutes, or until dough is smooth and elastic. Place in large oiled bowl and turn to coat. Cover bowl with a clean towel. Let rise in a warm, draft free place for about one hour or until doubled in bulk.

Punch dough down. Divide dough into two equal parts and form each piece into a loaf. Place in greased 9x5x3-inch loaf pans. Cover and let rise about 45 minutes, or until nearly doubled. While dough is rising, preheat oven to 400 degrees. Bake loaves about 35 minutes or until top is golden brown. Bread is done when it slides easily from the pan and sounds hollow when tapped on the bottom. Let cool on wire racks. Yield: 2 loaves.


This time I didn't try to include nuts and seeds to the dough as I was going for simplicity. As far as the 3 to 3 1/2 cups of bread flour, I think I only used the two the recipe calls for in the first paragraph. When I was kneading the dough it got very dry on me and semi crumbly. I just continued working it and it eventually came together, but there was no way I needed an extra cup or more of bread flour at that point.

Also when I divided the dough I wasn't completely careful with making sure both amounts were sized the same, nor did I shape them into a loaf before I put them in the pans. As a result, my loaves were a tad misshapen but again, they still tasted fantastic. And I didn't use a bread maker with this recipe. Just the good old oven. It's not hard to make bread, but it's just something that takes ultimate precision. Much like ensuring your flour isn't gluten-free.

Whole Wheat Bread


It's so good to pop a few slices in the oven for a few minutes and then slather them with real butter. Yes, REAL butter. None of that fake stuff, yogurt butter or whatever else is on the shelves. Those products have their place in the cooking world, but fresh hot bread and real butter is a combination like no other. And the smell of fresh hot bread baking is unreal.

And while baking bread is a very precise science, it's not so difficult that it can't be done. I've never used a bread machine and as long as you follow the directions and know exactly what your recipe calls for, you too can have bread success!

Cream Cheese Dumplings

This was such a fun recipe and another great option for party appetizers or a way to experiment with these different fillings and tastes. I knew this recipe was something I wanted to make, but I also thought plain cream cheese was a bit ho-hum. But by digging through the fridge and pushing the limits a bit, I was able to create some pretty awesome taste combinations.


Cream Cheese Dumplings

Heat olive oil (about 2 inches) in a large, deep skillet
Take two blocks of cream cheese and mix them with any of the following:
Feta cheese
Goat
cheese
Garlic
Basil
Oregano
Sun dried tomatoes (in oil, drained and minced)
Salt
Pepper

Take wonton wrappers and lay them on a flat surface. Place a small spoonful of mixture in the center of the wrapper and lightly wet seams all the way around with water.

Pinch corner to corner to seal (will make an X pattern when looking straight down at it). Place wontons in oil and fry on each side until brown. Drain on paper towels


The only thing about this recipe that I didn't care for was the fact that my house smelled like the back of a greasy diner for a day or two after making the dumplings. I even had the vent on when the frying was taking place and it didn't trap all of the smell. But they were absolutely worth it.


The recipe says to use olive oil for frying, but I used canola oil. I also used low-fat Philly Cream Cheese and it turned out completely fine. I normally wouldn't advocate using fat-free in something like this, just because you never know about the consistency, but the low-fat was great. For the fillings, I followed a few of the choices from the actual recipe but I also threw in a few of my own:


Cream Cheese, Sun Dried Tomatoes and Basil
This kind of tasted like a pizza, only better. The sun dried tomatoes (packed in oil) had a nice warmth and the basil (fresh from my little potted plants outside) gave it that bite.


Mozzarella, Turkey Pepperoni and Basil
Here I used a mozzarella string cheese stick that I cut into chunks, and I cut the turkey pepperoni slices into quarters, and slivered the basil. It worked really well, except that the cheese didn't hold up as well as I had hoped. It melted and expanded in the hot oil, of course, but then it cooled down significantly and kind of turned into a blob. It tasted good, though.


Cream Cheese, Feta Cheese and Diced Garlic
Another delicious one! The feta really broke through and overpowered the cream cheese, which is exactly what I was hoping would happen. The garlic was great, too, after being super heated with the hot oil.


Diced Shrimp and Hoisin Sauce
Ooh, you weren't expecting this one, were you? Hoisin sauce is a Chinese dipping sauce, like soy sauce or plum sauce. I had this sauce on hand for a recipe I found in Cooking Light, Hoisin Glazed Beef Kebabs. I used frozen cooked shrimp that I thawed and diced into small pieces and mixed them with a teaspoon or so of the hoisin. Pretty good, but I think it was a solid third place as compared to some of the other mixtures I tried.


Cream Cheese Dumplings

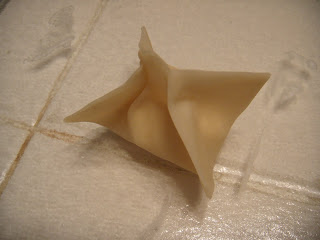
When the dumpling is folded, you see the "X"


Cream Cheese Dumplings

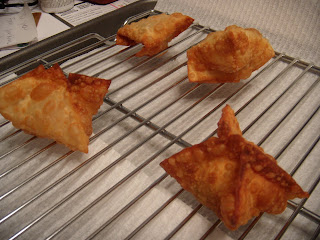
Cooling on the wire rack after coming out of the oil


Now I can't imagine these are all that good for you, but they're certainly fun to make and they definitely taste good. I used a large pot to fry in, but a deep fryer would also be the best choice. The wonton wrappers I used are Nasoya Wonton Wraps and I was able to find them at a few stores in town. They're refrigerated and usually found in the produce section, at least in my area. They're about 2"-3" square and come in a pack of 60 or so. When they go into the oil, they literally take no more than three or four minutes until they are crisp and brown and ready to come out. Please resist the urge to eat one immediately and do give them time to cool off.


I will definitely make these again and I'll do a few more combinations. I'd love to do one with chocolate, but I don't how well it would respond to the high temperatures since chocolate can burn easily. I think fruit might be good, too. Or, you can cut the wrappers into strips and fry them. From there, they can be used to top soup or just put out in a bowl for people to snack on. Pretty versatile!

Monday, September 28, 2009

Prosciutto and Parmesan Gougères

For the Husband's birthday last year, I surprised him with a class at our local Viking Cooking School. The theme was "Date Night in New York City" and we cooked different dishes particular to New York City establishments. This little gem was part of that class. We made these ourselves and then took the recipe home for future attempts. They're perfect for a party or appetizers before a holiday meal.


Prosciutto and Parmesan Gougères


½ stick unsalted butter (4 T) cut into small pieces
½ C water
¼ t fine salt
1/8 t granulated sugar
¾ C all-purpose flour
3 large eggs (plus one lightly beaten egg)
½ C finely grated Parmesan cheese (2 oz)
6 T finely chopped prosciutto (about 1 ½ oz)
1 pinch freshly grated nutmeg
1 pinch paprika

Preheat oven to 400 degrees; place a rack in the center of the oven.

Combine the butter, water, salt and sugar in a medium sauce pan over medium-high heat; bring to a boil. Immediately remove from heat and add the flour, beating vigorously with a wooden spoon until smooth.

Place the pan back over medium-high heat; cook, stirring constantly, until a smooth mass forms and pulls away from the sides of the pan, about two minutes. The bottom of the pan will be coated with a thin crust.

Transfer the choux paste to the bowl of an electric mixer fitted with the paddle attachment. On medium speed, add the three eggs, one at a time, mixing well after each addition. Add the parmesan, prosciutto, nutmeg and paprika.

Using a pastry bag fitted with a ½-inch round tip, pipe the warm choux paste onto parchment-lined baking sheets, forming mounds about ¾-inch in diameter. (Note: you may need to use a knife to cut off the choux paste when piping.) Lightly brush just the tops with the beaten egg, then gently smooth with wet fingers. (Note: Be careful to avoid dripping the egg down the sides of the mounds, as this may inhibit rising.)

Place in the preheated oven and bake for 15 minutes. Reduce oven to 375 degrees and continue baking until puffed and golden brown, about 20 minutes more. Transfer the gougères to a wire rack, cool slightly and serve warm or at room temperature.

Now even though I'm not necessarily known for following a recipe to a tee, and have sometimes made bizarre substitutions in place of ingredients I don't have on hand, that doesn't fly when it comes to precision baking like this. Every measurement, every iota of flour and eggs and salt has to be included or you risk dire consequences. And there are too many good things in this recipe for it not to turn out well.


This recipe honestly is more simple than it appears. It's very straightforward and shouldn't pose a problem for someone who wasn't born to bake. The choux paste, for instance, is nothing more than a dough. As for using a piping bag, I used a quart-sized Ziploc bag with a small corner of the bag snipped off. Just dollop the choux paste into the bag and pipe the dough onto the parchment lined baking pan. The freshly piped gougères looked like this:


Prosciutto and Parmesan Gougères


Prosciutto and Parmesan Gougères


When they bake, they don't rise all that much. They mainly become airy and much like puffs. Like this:


Prosciutto and Parmesan Gougères


The recipe says to bake them for an additional 20 minutes once you reduce the heat, but I actually put mine back in for about another 5-8 minutes when I took them out at the 20-minute mark to taste test them. The inside was still a little wet and hadn't dried out, so I let them go a little while longer. That extra few minutes really did the job, and they were fantastic! The egg glaze is what makes them so glossy, and it's really easy to pop three or four at a time until you realize the entire batch has been demolished. These would really be great for a pre-Thanksgiving appetizer or for a housewarming party.


Monday, August 24, 2009

French Onion Soup

I'm weird about onions. I won't eat them raw, like on a sandwich or hamburger, unless they're chopped up in salsa, and I really don't like red onions. I find them to be incredibly strong. But I will go to town on some onion rings and French Onion Soup. I've had this soup at restaurants before where it was really good, and the Husband made me some French Onion Soup years ago right after we were married that was wonderful. A few weeks ago, the Husband and I went to a local restaurant where I ordered a crock of French Onion Soup. They may as well have called it French Where's-the-Onion Soup, because as I slurped my way closer and closer to the bottom of the bowl, the only things I had consumed were infinitely salty beef broth, some croutons and a mass of stringy cheese. The only things in my soup that resembled onions were microscopic and had been cooked to an oblivion and had started to disintegrate. Very disappointing. That experience was not wasted, though, as it spurred me to make this recipe the following week.


French Onion Soup

Prep: 20 minutes
Cook: 50 minutes
Serves: 4

2 T butter or stick margarine
4 medium onions, sliced
2 cans (10.5 oz) condensed beef broth
1.5 C water
1/8 t pepper
1/8 t dried thyme leaves
1 bay leaf
4 slices French bread, ¾ to 1 inch thick, toasted
1 C shredded Swiss or mozzarella cheese
¼ C grated Parmesan cheese

1. Melt butter in 4-quart nonstick Dutch oven over medium-high heat. If desired, cook onions in 12-inch nonstick skillet; after cooking, transfer onions to Dutch oven to complete the soup. Stir in onions to coat with butter. Cook uncovered 10 minutes, stirring every 3-4 minutes.

2. Reduce heat to medium-low. Cook 35-40 minutes longer, stirring well every 5 minutes, until onions are light golden brown (onions will shrink during cooking.)

3. Stir in broth, water, pepper, thyme and bay leaf. Heat to boiling; reduce heat. Cover and simmer 15 minutes. Remove bay leaf.

4. Set oven to broil. Place bread in 4 ovenproof bowls or in individual casseroles. Add onion soup. Top with Swiss cheese and sprinkle with Parmesan cheese. Place bowls on cookie sheet or in pan with shallow sides.

5. Broil with cheese about 5 inches from heat 1 to 2 minutes or just until cheese is melted and golden brown. Watch carefully so cheese doesn’t burn. Serve with additional French bread, if desired.


I think with this recipe, I was so excited to make it that I didn't slow down the process enough and consider it from all angles. First, I was so focused on just getting the onions sliced that I didn't ensure they were sliced thin enough and that all slices were made with a cut of the same width. Looking back, some slices were cut perfectly and some were cut a little on the wide side, so the end result when they were all in the pan was that some cooked too fast and some didn't get the full amount of cooking time required. The thinnest slices were starting to burn just as the thicker slices were turning that nice golden brown that is evident of French Onion Soup. So that was an issue.

The other thing was that when I was in the store, I decided I really didn't want to buy a whole loaf of French bread just for the two slices required for this recipe. I decided to use some whole wheat sandwich buns I already had. Wrong! Even after toasting said sandwich buns, they immediately began to get soggy upon putting them in the bowl with the soup, plus the buns were nowhere near dense enough to match French bread. Most unfortunate.

And going back to the onions, I opted to cook them in a non-stick skillet before putting them in the soup pot. Once they were done, or more precisely, once I could see that any further cooking would result in some incinerated onion slices, I put them into the pot with the broth and other ingredients.

I also used slices of Provolone to top the soup instead of Swiss cheese, simply because I had Provolone on hand. It was good and I could tell no difference between that type of cheese and any other that would be appropriate for this soup. It's gooey - it's melty - it's good.

French Onion Soup


The ultimate decision, however, is how the soup tasted. It was... okay. Not mind blowing. Much better than the restaurant soup that I had, but still not awesome. It was the onions and the soggy bread that really sealed the deal. However, this can easily be remedied to make a better soup next time. I really want to perfect this before fall.

Spiced Pita Chips and Greek Feta Spread

I intentionally chose these two recipes to go together for this blog entry. I figured they were ideal partners and what good is one without the other? There are probably other options when it comes to dipping pita chips, but this Greek-style dip was as good as any.


Spiced Pita Chips

Ingredients
2 tablespoons olive oil
1 teaspoon ground cumin
1/2 teaspoon ground coriander
1/4 teaspoon cayenne pepper
1/2 teaspoon garlic powder
1/4 teaspoon fresh ground black pepper
1/4 teaspoon salt
3 whole-wheat pitas, cut into 1/8's

Directions
Preheat oven to 350 degrees F. Combine olive oil and all spices in a large bowl. Add pita wedges and toss to coat, Spread in 1 layer on a baking sheet and bake for about 15 minutes, tossing once, or until pita is brown and crisp. Cool completely before serving.


Greek Feta Spread

½ lb Greek or French feta cheese
3 T extra virgin olive oil
1 garlic clove, thinly sliced
1 T minced fresh mint or 1 t crumbled dried mint
¼ t red pepper flakes, plus more as needed
6 Italian pepperoncini, plus more as needed, chopped

In a food processor, combine the cheese, olive oil, garlic, mint, the ¼ t red pepper flakes and the 6 chopped pepperoncini and process until smooth. Taste and add more red pepper flakes or pepperoncini as needed. Makes 1 ½ cups, serves four.


I made the pita chips first. I used whole wheat pitas and decided to halve the recipe. However, to provide the optimum amount of spice, I decided to keep the olive oil and spice amounts the same as if I were doing the full recipe. This turned out to be a wise decision, as the spices wouldn't have gone nearly as far if I had halved them, too. I mixed the olive oil and spices in a small bowl and dumped the triangular-cut pitas in there and just swirled it all around with a spoon. The pitas appeared to absorb a lot of the oil and I really had to make sure everything was distributed evenly. But once I was satisfied, I put them on the baking dish and popped them into the oven. They crisped up nicely, but still could have used more spice. After a day or two, they actually started to get a little tough and brittle, but they were still good and the spice held well.

Then I made the Greek feta dip. In this recipe I halved (approximately) the feta, olive oil and pepperoncini, but kept the full amounts of garlic, red pepper flakes and mint. I dumped everything into my mini food processor and took it for a spin. I even plated it up nicely for a photo op.

Spiced Pita Chips and Greek Feta Spread


So the pita chips are done and I have dip for them. I scooped up a bite of dip on the chip and as the combination met my tongue, my taste buds immediately began to seize up and retreat from the bitterness of the pepperoncini. Whoo! It definitely had a bitter twinge to it, but I think it was just that first bite that threw me off. The feta was adequately pungent, but the peppers added a definite kick. It wasn't hot, just an overwhelming bitter taste. So I threw it into the fridge to chill and let the flavors meld. The next night I tried it again and it had definitely softened overnight. The bitter taste was muted and the fact that it was cold, and not room temp, made a big difference. But still, I was faced with a small bowl of dip and a few remaining pita chips. What to do?

My answer came as my eyes settled on a refrigerated dough pizza crust I had just purchased. I pulled out the dough, slathered on some homemade pesto, and added some turkey pepperoni, fresh oregano, the remaining slices of a ball of mozzarella I used earlier in the week, sliced up half of a red pepper, and dolloped on the rest of the Greek feta spread. Genius! The perfect way to clean out the fridge and use the rest of the feta spread in a way that wouldn't be totally overwhelming to my senses.

Thursday, August 6, 2009

Extra recipe - Salmon with Snap Peas, Yellow Peppers and Dill-Pistachio Pistou

This is officially the longest title of a recipe I have cooked as of yet. But longer does not necessarily mean better. Nor can you guarantee that a recipe from a renowned cooking magazine will be the best thing you have ever eaten. I'm here to prove my case.


Salmon with Snap Peas, Yellow Peppers and Dill-Pistachio Pistou
Serves 4

1/3 C chopped fresh dill
1/3 C finely chopped green onions
1/2 C shelled natural pistachios or almonds, toasted and finely chopped
1/4 C plus 1 1/2 T pistachio oil or extra-virgin olive oil
2 yellow bell peppers or orange bell peppers, cut into 1/2-inch strips
1 pound sugar snap peas, trimmed, strings removed
1 garlic clove, minced
1/4 C water
4 6-ounce salmon fillets

Mix dill, green onions, pistachios and 1/4 cup of oil in a medium bowl. Season to taste with salt and pepper.

Heat 1/2 T oil in a heavy large skillet over medium-high heat. Add peppers and saute until beginning to soften, about 2 minutes. Add snap peas, garlic and 1/4 C water; sprinkle with salt. Saute until vegetables are just tender and water evaporates, 2 to 3 minutes. Stir in 1 rounded tablespoon pistou. Transfer vegetables to platter; tent with foil to keep warm. Reserve skillet (do not clean).


Heat remaining 1 tablespoon of oil in reserved skillet over medium-high heat. Sprinkle salmon with salt and pepper. Place salmon, skin side down, in skillet; cook until skin is crisp, about 3 minutes. Turn salmon and cook until almost opaque in center, about 3 minutes longer. Arrange salmon fillets over vegetables on platter. Spoon some pistou down center of each fillet and serve, passing remaining pistou alongside.


I love picking up magazines in the airport when I travel because it means I have my pick of titles I would ordinarily never purchase. This is one of them, Bon Appetit. Not only are the articles very entertaining and informative, but the food always looks so incredibly good. I have a very long way to go before my photography matches the styling in this magazine. A recipe will usually catch my eye if it has all kinds of yummy ingredients - in this case, salmon, colorful peppers and pistachios. All things I love. But it was very unfortunate that those three things did not work well in this recipe.


First, the pistou. I can only imagine it's pronounced like "pea-stew," but with a lot less Southern twang than would normally be associated. It's a lot like a basil pesto, except you're subbing dill for basil and subbing pistachios for pine nuts. It looks nice when it comes together, but for some reason the tastes just didn't work out for me.

Pistou


Next, the salmon. In past blog posts I have raved about the frozen fish selection at Target. With the exception of the bagged Tilapa, they have good frozen fish at good prices. The Mahi-Mahi and Ahi Tuna are two really good options. However, the salmon left a lot to be desired. First of all, the thawed fillets were really flat as compared to what you would buy fresh from the store. Also the texture of the fish was different and it didn't appear to be as solid, I guess, as fresh fish. And the Target salmon had a few bones in it, which is totally not desirable. So all in all, that was a really unfortunate purchase. The fish played a large part in the demise of this dish.

Salmon with Snap Peas, Yellow Peppers and Dill-Pistachio Pistou

What it looked like in the magazine

Salmon with Snap Peas, Yellow Peppers and Dill-Pistachio Pistou

What it looked like on our plate


After it was all cooked and plated up, it really looked nice. However, it didn't taste nice. The Husband and I both realized it after the first bite. We kind of looked at each other like, "Who is going to be the first person to say they don't like it?" I don't recall which one of us spoke up first, but it didn't matter. The feelings about this dinner were the same across the board. We won't be cooking this again, and we learned a tough lesson about food that looks good in a picture that doesn't transfer well to the plate.