Showing posts with label didn't like. Show all posts

Monday, August 24, 2009

French Onion Soup

I'm weird about onions. I won't eat them raw, like on a sandwich or hamburger, unless they're chopped up in salsa, and I really don't like red onions. I find them to be incredibly strong. But I will go to town on some onion rings and French Onion Soup. I've had this soup at restaurants before where it was really good, and the Husband made me some French Onion Soup years ago right after we were married that was wonderful. A few weeks ago, the Husband and I went to a local restaurant where I ordered a crock of French Onion Soup. They may as well have called it French Where's-the-Onion Soup, because as I slurped my way closer and closer to the bottom of the bowl, the only things I had consumed were infinitely salty beef broth, some croutons and a mass of stringy cheese. The only things in my soup that resembled onions were microscopic and had been cooked to an oblivion and had started to disintegrate. Very disappointing. That experience was not wasted, though, as it spurred me to make this recipe the following week.


French Onion Soup

Prep: 20 minutes
Cook: 50 minutes
Serves: 4

2 T butter or stick margarine
4 medium onions, sliced
2 cans (10.5 oz) condensed beef broth
1.5 C water
1/8 t pepper
1/8 t dried thyme leaves
1 bay leaf
4 slices French bread, ¾ to 1 inch thick, toasted
1 C shredded Swiss or mozzarella cheese
¼ C grated Parmesan cheese

1. Melt butter in 4-quart nonstick Dutch oven over medium-high heat. If desired, cook onions in 12-inch nonstick skillet; after cooking, transfer onions to Dutch oven to complete the soup. Stir in onions to coat with butter. Cook uncovered 10 minutes, stirring every 3-4 minutes.

2. Reduce heat to medium-low. Cook 35-40 minutes longer, stirring well every 5 minutes, until onions are light golden brown (onions will shrink during cooking.)

3. Stir in broth, water, pepper, thyme and bay leaf. Heat to boiling; reduce heat. Cover and simmer 15 minutes. Remove bay leaf.

4. Set oven to broil. Place bread in 4 ovenproof bowls or in individual casseroles. Add onion soup. Top with Swiss cheese and sprinkle with Parmesan cheese. Place bowls on cookie sheet or in pan with shallow sides.

5. Broil with cheese about 5 inches from heat 1 to 2 minutes or just until cheese is melted and golden brown. Watch carefully so cheese doesn’t burn. Serve with additional French bread, if desired.


I think with this recipe, I was so excited to make it that I didn't slow down the process enough and consider it from all angles. First, I was so focused on just getting the onions sliced that I didn't ensure they were sliced thin enough and that all slices were made with a cut of the same width. Looking back, some slices were cut perfectly and some were cut a little on the wide side, so the end result when they were all in the pan was that some cooked too fast and some didn't get the full amount of cooking time required. The thinnest slices were starting to burn just as the thicker slices were turning that nice golden brown that is evident of French Onion Soup. So that was an issue.

The other thing was that when I was in the store, I decided I really didn't want to buy a whole loaf of French bread just for the two slices required for this recipe. I decided to use some whole wheat sandwich buns I already had. Wrong! Even after toasting said sandwich buns, they immediately began to get soggy upon putting them in the bowl with the soup, plus the buns were nowhere near dense enough to match French bread. Most unfortunate.

And going back to the onions, I opted to cook them in a non-stick skillet before putting them in the soup pot. Once they were done, or more precisely, once I could see that any further cooking would result in some incinerated onion slices, I put them into the pot with the broth and other ingredients.

I also used slices of Provolone to top the soup instead of Swiss cheese, simply because I had Provolone on hand. It was good and I could tell no difference between that type of cheese and any other that would be appropriate for this soup. It's gooey - it's melty - it's good.

French Onion Soup


The ultimate decision, however, is how the soup tasted. It was... okay. Not mind blowing. Much better than the restaurant soup that I had, but still not awesome. It was the onions and the soggy bread that really sealed the deal. However, this can easily be remedied to make a better soup next time. I really want to perfect this before fall.

Thursday, August 6, 2009

Extra recipe - Salmon with Snap Peas, Yellow Peppers and Dill-Pistachio Pistou

This is officially the longest title of a recipe I have cooked as of yet. But longer does not necessarily mean better. Nor can you guarantee that a recipe from a renowned cooking magazine will be the best thing you have ever eaten. I'm here to prove my case.


Salmon with Snap Peas, Yellow Peppers and Dill-Pistachio Pistou
Serves 4

1/3 C chopped fresh dill
1/3 C finely chopped green onions
1/2 C shelled natural pistachios or almonds, toasted and finely chopped
1/4 C plus 1 1/2 T pistachio oil or extra-virgin olive oil
2 yellow bell peppers or orange bell peppers, cut into 1/2-inch strips
1 pound sugar snap peas, trimmed, strings removed
1 garlic clove, minced
1/4 C water
4 6-ounce salmon fillets

Mix dill, green onions, pistachios and 1/4 cup of oil in a medium bowl. Season to taste with salt and pepper.

Heat 1/2 T oil in a heavy large skillet over medium-high heat. Add peppers and saute until beginning to soften, about 2 minutes. Add snap peas, garlic and 1/4 C water; sprinkle with salt. Saute until vegetables are just tender and water evaporates, 2 to 3 minutes. Stir in 1 rounded tablespoon pistou. Transfer vegetables to platter; tent with foil to keep warm. Reserve skillet (do not clean).


Heat remaining 1 tablespoon of oil in reserved skillet over medium-high heat. Sprinkle salmon with salt and pepper. Place salmon, skin side down, in skillet; cook until skin is crisp, about 3 minutes. Turn salmon and cook until almost opaque in center, about 3 minutes longer. Arrange salmon fillets over vegetables on platter. Spoon some pistou down center of each fillet and serve, passing remaining pistou alongside.


I love picking up magazines in the airport when I travel because it means I have my pick of titles I would ordinarily never purchase. This is one of them, Bon Appetit. Not only are the articles very entertaining and informative, but the food always looks so incredibly good. I have a very long way to go before my photography matches the styling in this magazine. A recipe will usually catch my eye if it has all kinds of yummy ingredients - in this case, salmon, colorful peppers and pistachios. All things I love. But it was very unfortunate that those three things did not work well in this recipe.


First, the pistou. I can only imagine it's pronounced like "pea-stew," but with a lot less Southern twang than would normally be associated. It's a lot like a basil pesto, except you're subbing dill for basil and subbing pistachios for pine nuts. It looks nice when it comes together, but for some reason the tastes just didn't work out for me.

Pistou


Next, the salmon. In past blog posts I have raved about the frozen fish selection at Target. With the exception of the bagged Tilapa, they have good frozen fish at good prices. The Mahi-Mahi and Ahi Tuna are two really good options. However, the salmon left a lot to be desired. First of all, the thawed fillets were really flat as compared to what you would buy fresh from the store. Also the texture of the fish was different and it didn't appear to be as solid, I guess, as fresh fish. And the Target salmon had a few bones in it, which is totally not desirable. So all in all, that was a really unfortunate purchase. The fish played a large part in the demise of this dish.

Salmon with Snap Peas, Yellow Peppers and Dill-Pistachio Pistou

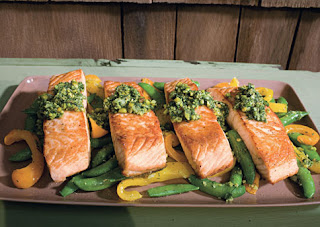
What it looked like in the magazine

Salmon with Snap Peas, Yellow Peppers and Dill-Pistachio Pistou

What it looked like on our plate


After it was all cooked and plated up, it really looked nice. However, it didn't taste nice. The Husband and I both realized it after the first bite. We kind of looked at each other like, "Who is going to be the first person to say they don't like it?" I don't recall which one of us spoke up first, but it didn't matter. The feelings about this dinner were the same across the board. We won't be cooking this again, and we learned a tough lesson about food that looks good in a picture that doesn't transfer well to the plate.

Monday, May 18, 2009

Pecan Crusted Tilapia

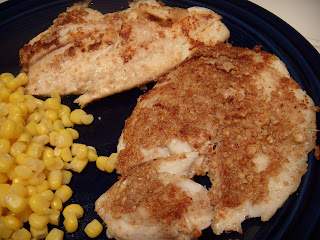
Tilapia is the kind of fish that takes other flavors very easily. It's so mild that if you cook it with anything else, the texture is really the only thing that remains to remind you're eating fish - the fish taste simply vanishes. We've done a really nice meal before with tilapia - cajun seasoning on the fish with red and green peppers and tomatoes - and I decided to give this recipe a try recently. I bought this bag of frozen tilapia fillets from Target (their Market Pantry brand) and when we had one before, the Husband said it tasted a little too fishy for tilapia. So I made this recipe when he worked late that night and figured I could make it again for him if it worked out. I will say that it didn't work out, but it wasn't just one thing - it was a combination of problems.


Pecan Crusted Tilapia

Serves: 4
Prep: 10 minutes
Cook: 8 minutes

½ C pecan halves
4 (6 oz) fresh tilapia fillets
1 t salt
½ t garlic powder
¼ t pepper
3 T butter

1. Process pecans in a food processor until finely chopped. Sprinkle fish with salt, garlic powder, and pepper. Dredge fish in finely chopped pecans.

2. Melt butter in a large nonstick skillet over medium-high heat; add fish, and cook 3-4 minutes on each side or until well browned and fish flakes with a fork.


I defrosted the tilapia overnight and it was ready to go. That's where a crucial step was left out of the recipe directions - pat the fish dry first. I really think this omission was the beginning of the end. I ground the pecans in my little food processor and spread them on a paper plate, seasoned the fish as directed, and then plopped the fish down on the plate to 'dredge' it in the chopped pecans. What started happening immediately is that the chopped pecans, finely chopped mind you, started to clump together and didn't want to adhere evenly to the fish. Then when I tried to spread them around to cover more of the fillet, they clumped more and started sticking to my fingers like dough. Ugh. I think patting the fish dry would have helped, but part of me thought the pecans might have been too fatty to use for this recipe. On the other hand, the Husband and I had a wonderful pecan-crusted trout at a fantastic tapas bar in Asheville, NC, a few years back and it was fantastic. So I know it can be done, but it just didn't want to work out for me.


Pecan Crusted Tilapia


I managed to get one piece semi-dredged in the chopped pecans, but by that point I had used up almost all of them up. I didn't want to chop more and waste them, so I applied the rest of the nuts to the other fish fillet as best I could, and put them in the pan. Here's where my next crucial error took place - I used too much butter in the pan. If the fish and nuts weren't soggy to begin with, they certainly were now. I also heated the pan too soon, so I had to remove the pan from the eye about 20 seconds before the fish were completely dredged and ready, as the butter had already started to smoke a little bit. I added more to compensate, but it was too much all together. At this point I was faced with one tilapia fillet with too many nuts in an uneven covering, one fillet with not nearly enough nuts, and too much butter in the pan. I was a hot mess.

Pecan Crusted Tilapia


After I felt the fish had cooked enough, which was a good bit longer than the 3-4 minutes suggested in the recipe, I removed them to a plate for inspection. The nuts hadn't really browned and they still weren't adhering very well. The one sad fillet with minimal nuts had pretty much lost the few survivors in the pan with the overabundance of butter, so he was naked. I covered him up with the other fillet. The taste was really underwhelming. Sure enough, the tilapia taste was pretty much nil, save for the nuts and salt, pepper and garlic powder, of which I could have added much more. The nuts were soggy and didn't have any crunch to them and the tilapia really did taste kind of fishy. I ate most of the two fillets I cooked to avoid throwing away my entire dinner, but I couldn't choke it all down. Even if I were to fix a few of my errors, I don't think I would cook this again.

Tuesday, May 12, 2009

Yucatan-Style Chicken, Lime and Orzo Soup

I did a little bit of research before writing this blog entry to find out more about this soup. I found it on the Epicurious site and it looked pretty popular. But now that I go back and see some of the reviews, I'm stumped. Lots of people said it was bland, some said it was the best thing they've ever had, and only a few mentioned the presence of lime in this dish. I don't know what lime has to do with the Yucatan area of Mexico, but they certainly must like it. However, the Husband and I didn't.


Yucatan-Style Chicken, Lime and Orzo Soup

3/4 cup orzo (rice-shaped pasta)

1 1/2 tablespoons olive oil
1 medium white onion, thinly sliced
6 garlic cloves, thinly sliced
2 jalapeño chiles, thinly sliced
3/4 pound skinless boneless chicken breasts, cut into matchstick-size strips
5 cups low-salt chicken broth
1/4 cup fresh lime juice
1 large tomato, seeded, chopped
1/4 cup chopped fresh cilantro
Fresh cilantro sprigs


Cook orzo in pot of boiling salted water until just tender. Drain well.

Heat oil in large saucepan over medium heat. Add onion, garlic, and chiles. Sauté until onion begins to brown, about 4 minutes. Add chicken; sauté 1 minute. Add broth, lime juice, and tomato. Simmer until chicken is cooked through, about 3 minutes. Mix in orzo, then chopped cilantro. Season soup with salt and pepper. Ladle soup into 4 bowls. Garnish with cilantro sprigs. Makes 4 servings.


Again, I halved this recipe because it's just the two of us and, well, this soup looked a little suspicious. It's better to make a small portion of something that's inedible rather than a large portion. But let me say that this soup wasn't inedible, and it didn't even, as the Husband and I joked, "put the 'Yuc' in Yucatan." It was okay, but we were correct that it wasn't all that filling, and the lime was just so strong. I didn't even put the full halved amount into the soup because I was a little wary of that much sour in the broth. It was okay.

Yucatan-Style Chicken, Lime and Orzo Soup


I did a few things differently. Instead of orzo, I used whole wheat brown rice from Whole Foods. We bought it dried in bulk and it's so good. Very nutty and a lot like the sticky rice you would find at a good Asian restaurant. That helped add some bulk to the soup. I used one chicken breast and did the thin slices. I only used one jalapeno, but I think two may have helped to overpower the lime juice somewhat. We didn't use nearly as much onion as it calls for. What is it with recipes calling for an entire onion? Ridiculous. Then I dropped a handful of cilantro into the soup which was a good kick.

This soup really had potential but the lime just turned us off. The rest of it wasn't good enough to where we would likely try it again with less lime; I think this is just a dud.

Tuesday, February 10, 2009

Beer Cheese Soup

There are a few truths that we hold fast to in life:
  1. When life gives you lemons, make lemonade.
  2. The only sure things are death and taxes.
  3. If you see this Beer Cheese Soup in a dark alley, train your sights and shoot to kill, leaving no survivors.
Beer Cheese Soup

1 T butter
½ C chopped onion
½ t minced garlic
1 t Worcestershire sauce
1 (12 fl oz) can or bottle light beer
1 (14.5 oz) can chicken broth
3 T cornstarch
2 C half and half
2 C shredded sharp Cheddar cheese

Melt the butter in a 4 ½ quart soup pot over medium heat. Add the onion, garlic and Worcestershire sauce and stir well. Add the beer and raise the heat to high and boil for 3 minutes to evaporate the alcohol. Add the chicken broth and bring the soup
back up to a boil. Lower the heat to medium-low and simmer.

Combine the cornstarch with 3 tablespoons water and stir until smooth. Set aside.

Add the half and half and shredded cheese to the soup. Stir constantly until the cheese melts. Then stir in the cornstarch mixture. Stir constantly until the soup is thick, about 2 minutes.

When I got home last night, I was pleasantly surprised to see the Husband was already in the kitchen chopping onions, measuring butter and pouring beer. He looked so happy and I was forever grateful for him starting dinner. I even went to a great bakery in town to pick up some small bread bowls to put the soup in. I was prepared for this to be a feast!

Boy, was I wrong.

The soup was thin, grainy, totally uncheesy and all I tasted was onion. It also never really thickened up. I know we followed the recipe to a tee. And then when I pulled the bread bowls out of the bag, there was a trace of mold on the bottom of the loaves. I had to cut off the bottom crust, therefore leaving no reliable barrier from keeping the soup from leaking out the bottom. Good thing the soup never even left the pan, huh? We tried a few spoonfuls each, added Tabasco sauce and more cheese and debated adding more ingredients before deciding there was no use in wasting more cheese/half and half/Tabasco if there was no guarantee those items would make the soup palatable. So we made burritos instead.

And to top it all off, soup doesn't photograph well. And yes I'm sure it has nothing to do with my photographic skills - what are you trying to say? At any rate, I took that as a sign that the soup must be evil and wouldn't stand for its picture to be taken.

My rating - this soup was a colossal failure. But I still love the Husband for trying and I know this wasn't operator error. The recipe just sucked.

Thursday, January 8, 2009

Smoky Shrimp and Parmesan-Polenta Cakes

A few months ago, my local Big Box Retailer cleaned up its image. Aisles were moved around and widened, new signage was installed, new carts were brought in and new foods were introduced. A month or so after the transformation, which only slightly lessened my overall aversion I have to the store, I found a tube of polenta in the refrigerated goods section near the produce. I snatched it up, fearful someone else might have their eye on it. I took it home and it sat in my fridge for a few weeks until I decided to do this cooking thing. I knew it had to be used so I found two polenta recipes to try out. Tonight was one of them.


Smoky Shrimp and Parmesan-Polenta Cakes

Yield 4 servings

Ingredients
1 tablespoon olive oil
1 pound peeled and deveined medium shrimp
1/4 cup dry white wine
1 tablespoon chopped fresh chives
1 tablespoon fresh lemon juice
1/4 teaspoon Spanish smoked paprika
1 17-ounce tube polenta, cut into 8 (1/2-inch) slices
Cooking spray
8 teaspoons marinara sauce
8 teaspoons grated fresh Parmesan cheese
1 tablespoon chopped fresh flat-leaf parsley


1. Preheat broiler.
2. Heat oil in a large skillet over medium-high heat. Add shrimp to pan; sauté 3 minutes or until done, stirring frequently. Remove from heat; stir in wine, chives, juice, and paprika, tossing to coat. Keep warm.
3. Place polenta slices on a baking sheet coated with cooking spray. Top each slice with 1 teaspoon sauce and 1 teaspoon cheese; broil 3 minutes or until cheese melts. Place 2 polenta slices on each of 4 plates; top each serving evenly with shrimp mixture. Sprinkle with parsley.


Smoky Shrimp and Parmesan-Polenta Cakes

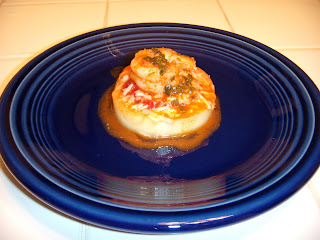
Looks pretty, but wasn't too tasty


I think my problem is that I'm just not familiar enough with polenta to do it right, even though I went by the directions and cooked this dish exactly as it says. I didn't like it, but I don't think it was just the polenta that did me in. It was the fact that with the marinara sauce and shredded parmesan, the polenta tasted like spaghetti minus the noodles. The shrimp were good, but I think I over did it on the smoked paprika. Oops. I was not a fan. I really wanted this dish to work but it clearly didn't. I guess it could be an appetizer, because it's certainly not big enough to be an entree, and it isn't a finger food. Plus, the cheese cooled down pretty quickly and stiffened up, but I guess that's Parmesan for you.


So as I was cleaning up the counter I spied that bag of 90 corn tortillas from Monday's Mexican Chicken Casserole. A light bulb went off. I pulled out a knife, cut a few tortillas into wedges, laid them on a cooking sheet, sprayed them with a little cooking spray and sprinkled them with chili powder and baked them at 375˚ for 8 minutes. Voila! Tortilla chips! They tasted pretty good and probably could have cooked for a minute or two longer to make them more crispy, but they'll crisp up more as they continue to cool.

Chips!


Tortilla chips!