Showing posts with label easy. Show all posts

Thursday, November 5, 2009

Peanut Butter Granola

I figured this could be a mutli-purpose recipe that would serve both the dessert and breakfast tastes. I immediately found a breakfast option, and dessert can't be far behind.


Peanut Butter Granola

Prep: 15 minutes
Cook: 3 minutes
Bake: 20 minutes
Cool: 20 minutes

3 C uncooked oats
½ C dry-roasted peanuts
½ C sweetened flaked coconut
3 T sesame seeds
½ C creamy peanut butter
½ C firmly packed brown sugar
¼ C butter
1 T light corn syrup
¼ t salt

Preheat oven to 350˚. Toss together oats through sesame seeds. Cook peanut butter through salt in a small saucepan over medium heat 3 minutes or until smooth. Stir peanut butter mixture into oat mixture until blended. Spread mixture in a single layer on a lightly greased, aluminum foil lined 17x12 inch jelly roll pan. Bake 20 minutes or until lightly golden, stirring after 10 minutes. Transfer to wax paper and cool completely, about 20 minutes. Serve with vanilla yogurt and sliced bananas. Makes 6 cups.


Like I said, this immediately became a breakfast food. I had a recipe for a yogurt parfait that I found right around the time I decided to make the peanut butter granola, so I figured the best possible idea was to combine the two. Otherwise, I would not have had any use for the granola. It held up well when it was all being mixed together and there were even some small clumps that loosely formed. And when I spread it all out on the parchment paper, I was shocked at how much there really was. I mean, there was a ton of this stuff.
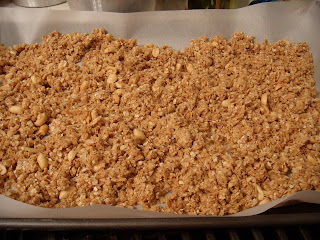


Peanut Butter Granola


But it cooked nicely, and again with my oven, I could have backed the time off by about two minutes. There was a small burned taste when it all came out of the oven, but it wasn't very strong and was easily masked by the yogurt. It's probably not substantial enough to be used as a granola-type cereal, and I guess it could be a topping for some kind of apple crisp. But for me, it worked well as a parfait. I used Yoplait Vanilla yogurt and sliced up some banana and layered it all in a glass. Perfect! And portable, too. I took some in the mornings when I left for work and I was able to sneak in a few bites at stop lights. Maybe not the safest thing to do while driving, but I was fairly responsible about it, only driving with my knees when absolutely necessary.


Peanut Butter Granola


And there you go! I'm sure there are a lot of other ways to use this granola, but the parfait was the easiest thing for me. And in the immortal words of Donkey from Shrek, "Everybody loves parfaits!"

Monday, November 2, 2009

Goat Cheese Mashed Potatoes

Come on - how can this not sound delicious? You have potatoes, you have heavy cream, you have goat cheese. Plus, this recipe came out of an Emeril Lagasse cookbook so you know it's going to be good.

Goat Cheese Mashed Potatoes

Serves: 8

4 C peeled and diced white potatoes
1 ½ t salt
¾ C heavy cream
¼ C unsalted butter
½ pound goat cheese, crumbled
1/8 t freshly ground white pepper

Combine the potatoes and 1 teaspoon of the salt in a large saucepan. Cover the potatoes with water, bring to a boil and cook over medium heat until fork tender, about 20 minutes. Drain.

Return the potatoes to the saucepan and, over low heat, stir them with a fork or wire whisk for about 2 minutes to dry them. Add the cream, butter, cheese, the white pepper and the remaining ½ teaspoon salt. Mix well. Serve hot.


I cannot tell you how much this hit the spot. I had been craving potatoes for the longest time and I couldn't wait much longer before making this. As far as the ingredients, I went pretty far off the rails this time when I was throwing it together. I didn't measure a thing, just eyeballed it, and it turned out more than fine. It was fantastic. I only had two potatoes, which didn't equal four cups of diced potatoes, so I reduced the other ingredients accordingly. I also used fat-free half and half instead of heavy cream, which didn't pose any problems. Same with the butter, goat cheese and white pepper - I just threw in however much I thought looked like a good amount. Sometimes I don't even know why I bother with a recipe.


In the "mix well" portion of the recipe, it's referring to the actual mashing of the potatoes though it's not specifically stated as such. A wonderful little tool I've found works great to mash potatoes is a pastry cutter. A blender can be too rough and a fork just doesn't do it. The pastry cutter lets you work at your own speed and determine how chunky or smooth you want the potatoes to be.


Goat Cheese Mashed Potatoes


This is the finished product. If you look closely you can see little white specs - that's the goat cheese. I'm only slightly ashamed to admit that I mostly ate this straight from the pot I cooked it in - it was that good. These were rich without being overpowering and creamy without being runny. A perfect combination.

Monday, August 24, 2009

Spiced Pita Chips and Greek Feta Spread

I intentionally chose these two recipes to go together for this blog entry. I figured they were ideal partners and what good is one without the other? There are probably other options when it comes to dipping pita chips, but this Greek-style dip was as good as any.


Spiced Pita Chips

Ingredients
2 tablespoons olive oil
1 teaspoon ground cumin
1/2 teaspoon ground coriander
1/4 teaspoon cayenne pepper
1/2 teaspoon garlic powder
1/4 teaspoon fresh ground black pepper
1/4 teaspoon salt
3 whole-wheat pitas, cut into 1/8's

Directions
Preheat oven to 350 degrees F. Combine olive oil and all spices in a large bowl. Add pita wedges and toss to coat, Spread in 1 layer on a baking sheet and bake for about 15 minutes, tossing once, or until pita is brown and crisp. Cool completely before serving.


Greek Feta Spread

½ lb Greek or French feta cheese
3 T extra virgin olive oil
1 garlic clove, thinly sliced
1 T minced fresh mint or 1 t crumbled dried mint
¼ t red pepper flakes, plus more as needed
6 Italian pepperoncini, plus more as needed, chopped

In a food processor, combine the cheese, olive oil, garlic, mint, the ¼ t red pepper flakes and the 6 chopped pepperoncini and process until smooth. Taste and add more red pepper flakes or pepperoncini as needed. Makes 1 ½ cups, serves four.


I made the pita chips first. I used whole wheat pitas and decided to halve the recipe. However, to provide the optimum amount of spice, I decided to keep the olive oil and spice amounts the same as if I were doing the full recipe. This turned out to be a wise decision, as the spices wouldn't have gone nearly as far if I had halved them, too. I mixed the olive oil and spices in a small bowl and dumped the triangular-cut pitas in there and just swirled it all around with a spoon. The pitas appeared to absorb a lot of the oil and I really had to make sure everything was distributed evenly. But once I was satisfied, I put them on the baking dish and popped them into the oven. They crisped up nicely, but still could have used more spice. After a day or two, they actually started to get a little tough and brittle, but they were still good and the spice held well.

Then I made the Greek feta dip. In this recipe I halved (approximately) the feta, olive oil and pepperoncini, but kept the full amounts of garlic, red pepper flakes and mint. I dumped everything into my mini food processor and took it for a spin. I even plated it up nicely for a photo op.

Spiced Pita Chips and Greek Feta Spread


So the pita chips are done and I have dip for them. I scooped up a bite of dip on the chip and as the combination met my tongue, my taste buds immediately began to seize up and retreat from the bitterness of the pepperoncini. Whoo! It definitely had a bitter twinge to it, but I think it was just that first bite that threw me off. The feta was adequately pungent, but the peppers added a definite kick. It wasn't hot, just an overwhelming bitter taste. So I threw it into the fridge to chill and let the flavors meld. The next night I tried it again and it had definitely softened overnight. The bitter taste was muted and the fact that it was cold, and not room temp, made a big difference. But still, I was faced with a small bowl of dip and a few remaining pita chips. What to do?

My answer came as my eyes settled on a refrigerated dough pizza crust I had just purchased. I pulled out the dough, slathered on some homemade pesto, and added some turkey pepperoni, fresh oregano, the remaining slices of a ball of mozzarella I used earlier in the week, sliced up half of a red pepper, and dolloped on the rest of the Greek feta spread. Genius! The perfect way to clean out the fridge and use the rest of the feta spread in a way that wouldn't be totally overwhelming to my senses.

Wednesday, June 3, 2009

Pasta with Broccoli Raab, Goat Cheese, Sundried Tomatoes and Toasted Pine Nuts

Unlike most of the other recipes I've made so far, I actually stayed pretty close to the measurements on this particular recipe. With the exception of substituting a regular broccoli crown for broccoli raab, this was created to the letter. Yes, real butter and extra goat cheese. I don't think this was very healthy, but it really hit the spot.


Pasta with Broccoli Raab, Goat Cheese, Sundried Tomatoes and Toasted Pine Nuts

1 T extra virgin olive oil
3 C broccoli raab cut into small pieces
2-4 minced garlic cloves
¼ to ½ t crushed red pepper flakes
Salt/ground pepper
1 ½ C canned chicken broth
1 t chopped fresh thyme
4 T unsalted butter, cut into small pieces
4 oz creamy goat cheese, crumbled
¾ lb dried bowtie or orecchiette pasta
4 T thinly sliced sun dried tomatoes
2 T pine nuts, toasted in a small skillet over low heat until golden, 3-4 minutes


Bring a large stockpot of water to a boil. Meanwhile in a 12-inch sauté pan, heat the olive oil over medium-high heat. Add the broccoli raab, garlic and red pepper flakes and sauté, stirring frequently until bring green and tender crisp, 2-3 minutes. Season lightly with salt and pepper and then transfer to a bowl and set aside.

Still over medium-high heat, add the chicken broth to the pan and stir and scrape to deglaze the pan deposits. Add the thyme. Bring the liquid to a boil and continue boiling briskly until it reduces to half its original volume, 7-10 minutes. Add the goat cheese and butter and stir until the goat cheese melts. Cover and keep warm.

As soon as the stockpot of water comes to a full boil, add a little salt to the water. Add the pasta and cook until al dente. Drain the pasta and immediately add it to the pan of sauce along with the broccoli raab and the sun dried tomatoes. Heat mixture thoroughly, season to taste. Sprinkle with pine nuts.


This was a pretty indulgent dish. The sauce came together nicely, especially after deglazing and letting the stock boil down. I cooked the pasta right alongside everything else so it all came together at the same time - kind of rare for me. Usually everything gets done at different times and I have to cover everything or stick it in the oven to stay warm, but not this time. It also helps to have all of your ingredients out and pre-measured before you start. Chop the broccoli, measure out the chicken broth, measure out the butter and goat cheese - stuff like that. It just helps things move along better.


Pasta with Broccoli Raab, Goat Cheese, Sundried Tomatoes and Toasted Pine Nuts


The sauce covered much better than how it looks in the picture. It was very creamy, especially with the butter and cheese, and the flavors were really top notch. It coated the pasta and wasn't too overwhelming. I did catch a few spicy bites due to the red pepper flakes, but I did add a few extras in there. I'm a sucker for red pepper flakes.

The husband is not a fan of broccoli - yet. He did eat a raw piece of it a few weekends ago and lived to tell the tale, but I don't foresee him eating a huge hunk of it in the near future. I'm still holding out hope, though. If you're not a broccoli fan, that could easily be substituted for red/yellow/orange sweet pepper strips, snow peas, zucchini chunks, eggplant or almost any other vegetable. This is a pretty adaptable meal, and one I would love to make again.

Monday, June 1, 2009

Crispy Curried Chicken Tenders with Cilantro Dipping Sauce

I made this recipe the other night, but I'm going to have to make it again soon. Not that I messed it up or anything, but I was afflicted with some nasty allergies when I made this for dinner and my stopped up nose wasn't working too well. Therefore, this meal ended up tasting really muted. It still tasted good, but I need another go at it when I'm not sickly.


Crispy Curried Chicken Tenders with Cilantro Dipping Sauce
ACTIVE: 45 MIN
SERVINGS: 4
Ingredients
1 cup mayonnaise
2 cups loosely packed cilantro leaves
2 tablespoons fresh lemon juice
Kosher salt and freshly ground pepper
1 tablespoon plus 1 teaspoon Madras curry powder
1/2 teaspoon cayenne
1/2 cup all-purpose flour
3 large eggs, beaten
2 cups panko
2 pounds chicken tenders
3/4 cup vegetable oil

Directions
In a food processor, blend the mayonnaise with the cilantro and lemon juice until the cilantro is finely chopped. Season with salt and pepper and refrigerate the dipping sauce until ready to serve.


In a small bowl, combine the curry powder with the cayenne and 1 tablespoon of salt. Put the flour, eggs and panko in 3 shallow bowls. Stir 2 teaspoons of the curry powder mixture into the panko. Season the chicken tenders with the remaining curry powder mixture.

Dredge the chicken tenders in the flour and shake off any excess, then dip them in the eggs and coat thoroughly with the panko mixture. In a large skillet, heat half of the oil until shimmering. Add half of the chicken tenders and fry over moderate heat until golden and cooked through, about 10 minutes. Drain on paper towels. Repeat with the remaining oil and chicken tenders. Serve with the cilantro dipping sauce.


Aside from the stopped up nose and somewhat bland taste, I think this would have been really good under different circumstances. The seasoning is what didn't register as much as it normally would have, but the panko made for a wonderfully crunchy texture and they weren't oily and greasy like you would normally find things cooked in oil. A hot pan of oil and the panko really make the difference here.

Crispy Curried Chicken Tenders with Cilantro Dipping Sauce


This dish came together really easily. I think I still might add more curry powder to my next attempt. There needed to be a little more of a punch than what I got when I ate them. Also, this Cilantro Dipping Sauce. I have an aversion to mayonnaise that causes me extreme distress when I have to eat said substance in any form other than chicken salad or potato salad. Even then, you had better go lean on the stuff. Therefore, I could not, in good conscience, whip up a dipping sauce that called for that much mayo, and even halved with 1/2 cup I could not bring myself to do it. So I ate them plain, and they were still fine (albeit bland). I tried to dip them in ranch dressing but that was not good, so they stayed plain.

I'll make this again when I'm feeling better. Also, I get the feeling this is a little better for you than all out fried chicken because you're not using as much of the oil - just a little. Also, I used whole wheat panko, so that's double on the healthy score. Thumbs up all around.

Monday, April 27, 2009

Five Minute Chocolate Cake in a Mug

Don't laugh. You know you want to make this yourself. That's a pretty tempting title and now you're intrigued, aren't you? Of course, you could have been one of the 2,394,042 people who received this recipe in an email forward and a message something along the lines of, "OMG you have to try this! It is SOOOOO cool and it really works!!" Normally when I get an email with a message that sounds like a chain letter, I delete it. But naturally, I was drawn to the recipe because I'm a sucker for chocolate, and especially chocolate that can be made into cake form in less than five minutes AND doesn't even require an oven. I'm all about simplicity. And somewhere deep inside, I secretly hoped this recipe wouldn't work. I don't need to be five minutes from a hunk of chocolate cake. It's not good for the waistline. But after trying this, I am sold. And I may need to invest in some pants with an elastic waistband.


Five Minute Chocolate Cake in a Mug

4 tablespoons self rising flour
4 tablespoons sugar
2 tablespoons Hershey's cocoa (regular or dark)
1 egg
3 tablespoons milk
3 tablespoon oil
3 tablespoons chocolate chips (optional)
a splash of vanilla extract (optional)
cooking spray for easy clean up
1 large coffee mug or hot chocolate mug


Add dry ingredients to mug, and mix well. Add the egg and mix thoroughly. Pour in the milk and oil and mix well. Add vanilla extract and coat the chocolate chips with flour (if using, this will prevent the chips from collecting on the bottom.), and mix again. Put your mug in the microwave and cook for 3 minutes in a 1000 watts microwave. Adjust time if needed. The cake will rise over the top of the mug a little, but don't be alarmed. Allow to cool a little, and tip out onto a plate if desired.


*snort* Like chocolate chips are ever optional. Whatever. That's funny. So anyway, I was chuckling to myself as I put this concoction together. I kept thinking that there was no way this would work out - it was just too simple! But as the ingredients gradually came together I realized this was starting to resemble actual cake batter. It was precisely at that moment that I knew I was in big trouble if this actually creates an edible cake. And did it ever. I am so in trouble. It's really, really good.

Five Minute Chocolate Cake in a Mug


Don't you just want to jump through the computer screen and take a huge bite? Yes, you do. Because there is easily enough for two (or three) people to dive into this thing. I did coat the chocolate chips with flour but they still sunk to the bottom of the mug after cooking. And regarding the mug, I used the biggest one I have. It's probably 5.5" tall with about a 3.5" wide mouth. I'm just estimating here, but it's bigger than your run of the mill coffee mug. When it was baking, the cake rose up over the top by about an inch, but there were only those small drips down the side. And you'll see there is a mention of cooking spray in the ingredient list but no mention of applying said cooking spray to the inside of the mug before you add the ingredients. I think the spray would work, although I didn't use it and all I had to do was run a knife around the outside edge of the cake to loosen it enough for the cake to plop out (with the exception of the chocolate chips). I think I would apply the cooking spray, mix the ingredients in a separate bowl and then pour into the mug. That might work.

The texture of the cake was pretty spongy and not quite as moist as a box cake mix would be. The taste was good. Like, really good. For the minimal effort that goes into the recipe, the taste delivers tenfold. No, it's not Duncan Hines or Betty Crocker, but it works well in a pinch. If you need a quick chocolate fix or you have a birthday girl/boy coming over on short notice, whip this up. You can even throw on some icing and pop a candle in the top. Make it. You know you want to. I'll even share my elastic waistband pants with you.

Friday, April 24, 2009

Extra Recipe #2 - Savory Seafood Penne

I get recipes from a lot of different places. In fact, to compile the original list of recipes for this blog I searched far and wide on the 'Net to look for new and interesting foods to cook. You just never know what's out there. The Husband's healthy eating quest has now added Men's Health magazine to our list of recipe archives. Everything we've eaten has turned out really well, and I have decided there is one single solitary reason for this: the recipes are made for dudes, by dudes. Mario Batali and Wolfgang Puck aside, most guys don't do much cooking. That either resides with their female counterpart if they're married or co-habitating, or they subsist on take-out and mom's leftovers. A man's crowning achievement in the kitchen sometimes results in a pile of Velveeta nachos with a jalapeno garnish. He's overjoyed at what he has accomplished while you, his dutiful wife/girlfriend/women of his harem, are aghast that one would consider routinely defiling their body with such a greasy mess and angry that dinner plans now most certainly do not include a romantic trip to Chez Frou Frou.

Oh, who am I kidding. I love nachos. Furthermore, that was a gross generalization of men which is unfair considering the Husband's kitchen ability. I can entrust him with just about anything in the kitchen and he can whip it up.

So what I'm saying is that Men's Health almost has to make their recipes fool proof for those men out there who don't know the difference between a rolling pin and hole in the ground. And the hilarious thing about this magazine is that they even include pictures of the ingredients! When it says, "1 cup chopped tomatoes," you will see a picture of a tomato right above that instruction. Same for shrimp, pesto, Gorgonzola, and spinach, which all go into this recipe.


Savory Seafood Penne

2 oz Barilla Plus penne pasta
14 medium precooked, peeled shrimp
2 tbsp crumbled Gorgonzola cheese
3 cups chopped baby spinach
1 tomato, chopped
2 tbsp chopped walnuts
3 tbsp ready-made pesto

Directions
1.If you're using frozen shrimp, defrost them by running warm water over them. Cook the pasta according to package directions; drain and transfer it to a large bowl. Add the shrimp, cheese, spinach, tomato, walnuts, and pesto, stirring well to help wilt the spinach and mix in the pesto.


And that is all there is to it! Boil the pasta and then throw everything in a big bowl together. Can't be any more straightforward than that - love it! And it turned out really well. A few things I did differently: I made my own pesto when it calls for jarred stuff. I really prefer to know exactly what goes into my pesto - basil, pine nuts, parm, garlic, olive oil - and what I make probably has less fat than store bought pesto. Also, shocker, but I eyeballed a lot of the ingredients. I didn't exactly measure out the cheese or the spinach or the pesto. Don't act like you're surprised. If you've read any of my other posts you know that's pretty much common place for me. Finally, there is no mention of par boiling the shrimp. It calls for precooked, frozen shrimp, which is what I used, but I still wanted mine to have a little more doneness to them, and I didn't trust the hot pasta to cook the shrimp enough to my liking. So when I drained the pasta, I reserved the pasta water and dropped the thawed shrimp in there for about two minutes, stirring often. They pinked up and curled so I knew they were done. Throw it all into a bowl, toss well, and voila.

Savory Seafood Penne


I've been pretty impressed with the recipes that have come from Men's Health magazine. I'll try to post some in the near future. If this streak continues, they'll have a better succession rate than Southern Living's recipes.

Thursday, April 2, 2009

Spaghetti with Tomatoes, Basil, Olives, and Fresh Mozzarella

This dish made me think of summer. It's light, doesn't require lots of cooking time and would be perfect with fresh ingredients from the farmer's market. It was really a hit. We did add a few extra items, which I'll get to, but the recipe in its original state would be so good for a light, summer dinner.


Spaghetti with Tomatoes, Basil, Olives, and Fresh Mozzarella

Ingredients
2 pounds vine-ripened tomatoes (about 6), chopped
3/4 pound salted fresh mozzarella, cut into 1/4-inch cubes, at room temperature
1 1/4 cups chopped fresh basil
1/2 cup halved and pitted black olives
4 teaspoons balsamic vinegar
1 1/4 teaspoons salt
1/2 teaspoon fresh-ground black pepper
1 pound spaghetti
1/2 cup olive oil
3 cloves garlic, minced

Directions
In a large glass or stainless-steel bowl, combine the chopped tomatoes with the mozzarella, basil, olives, balsamic vinegar, salt, and pepper.

In a large pot of boiling, salted water, cook the spaghetti until just done, about 12 minutes. Drain, add to the tomato mixture, and toss.

Heat the oil in a small frying pan over moderately low heat. Add the garlic and cook, stirring, for 1 minute. Pour the oil over the pasta and toss again.

Like I mentioned above, we added a few extra ingredients to increase the bulk and protein in this dish. First we did whole wheat pasta to get the good, healthy grains. We added some shrimp, thawed from the freezer, and some sliced and pan-cooked prosciutto. Maybe we're just conditioned to seeing large portions, but I don't think the original recipe would have filled us up for dinner. Maybe I'm wrong. Either way, the extra goodies tasted great and were a nice addition.


Tomato, mozzarella and basil mixture

Tomato, mozzarella and basil mixture.


For the prosciutto, I found it sliced in the local grocery store. I chopped up two thin slices and cook them in a pan with a little olive oil along with the oil and garlic in the last step of the directions. Oh, and the olive oil. We halved this recipe, and even then we most certainly didn't use the whole amount of olive oil to pour over the pasta in the last step. That's a lot of olive oil, and I can understand using that if you need to slick up your insides to get rid of a hairball or something, but I don't think normal people (myself and the Husband) need that much oil floating around in our dinners. We did a fraction of that, and while we didn't have much of a sauce, it still was fine.


Another thing we did was attempt to warm the pasta for a few minutes before we ate. We drained the pasta, added the tomato mixture, along with the mozzarella, and put it on low heat while the prosciutto-garlic mixture cooked. In retrospect, we should have reconsidered what happens to cheese when you heat it up - it melts. And gets really stringy, mozzarella especially. So when we removed it from the heat we did have hot pasta, but we also had a mass of melted cheese goo in the bottom of the pan. Not quite what was supposed to happen. Maybe next time we'll just prep everything faster.


But even with the melty cheese, it was really good. See for yourself.

Spaghetti with Tomatoes, Basil, Olives, and Fresh Mozzarella

Finished product, including shrimp and prosciutto.

Monday, January 5, 2009

Mexican Chicken Casserole

Thanks to driving rain, a longer commute than normal and a trip to the grocery store, I arrived home at 7:20 tonight. That's two hours after I left work. I normally have a long commute, but tonight was really an eye opener in that I will still have to cook even if I don't want to. I would have loved to just sit on the couch after braving that mess, but the kitchen awaits. So, I donned my best knock-around clothes (a 10-year-old college party shirt and track pants), fed the beast:

The Beast

*urp*

... and got to work.

Mexican Chicken Casserole

1 cup fat-free, less-sodium chicken broth
2 (4.5 oz.) cans chopped green chiles, divided
1 3/4 lbs. skinned, boned chicken breasts
2 tsp. olive oil
1 cup chopped onion
1 cup evaporated skim milk
1 cup (4 oz.) shredded Monterey Jack cheese
1/4 cup (2 oz.) tub-style light cream cheese
1 (10-oz.) can enchilada sauce
12 (6-inch) corn tortillas
Cooking spray
1/2 cup (2 oz.) shredded reduced-fat extra-sharp cheddar cheese
1 oz. tortilla chips, crushed

Combine broth and 1 can of chiles in a large skillet; bring to a boil. Add chicken; reduce heat, and simmer 15 minutes or until chicken is done, turning chicken once. Remove chicken from cooking liquid, reserving cooking liquid; cool chicken. Shred meat with two forks, and set aside. Preheat oven to 350 degrees.
Heat oil in a large nonstick skillet over medium-high heat. Add 1 can of chiles and onion; sauté 3 minutes or until soft. Add reserved cooking liquid, milk, Monterey Jack cheese, cream cheese and enchilada sauce; stir well. Stir in shredded chicken; cook 2 minutes. Remove from heat.
Place four tortillas in the bottom of a 2 quart casserole coated with cooking spray. Spoon 2 cups chicken mixture over tortillas. Repeat layers twice, ending with chicken mixture. Sprinkle with cheddar cheese and chips. Bake at 350 degrees for 30 minutes or until thoroughly heated. Let stand 10 minutes before serving. Makes
eight servings (about 1 cup per serving).


Mexican Chicken Casserole

Final product


Keep in mind that I halved this recipe, since it's just me here at the house now. I'll be taking lots of these leftovers to work for lunch in the following days, but I want to minimize the amount of food I have laying around. This recipe halved easily and I didn't have any problems. I ended up using a little more chicken broth in the very first part of the recipe just to make sure I had enough liquid in the pan to cook the chicken. When the cooking liquid-milk-cheese-cheese-enchilada sauce came together, it looked really soupy. I was afraid I would have to reduce the amount I put into the casserole, but as soon as I added the chicken it thickened up nicely. I used a few extra corn tortillas when doing the layering, considering the only option to purchase corn tortillas at my Big Box Retailer was in packs of 90. Ninety corn tortillas? The hell am I going to do with 90 corn tortillas?!


Once the dish was assembled, I popped it in the oven uncovered. Looking back, I should have covered it while cooking because the cheese that was on top of the dish came out of the oven looking a little rubbery. It tasted fine, but some foil on top probably would have prevented that. When it came out it was bubbling and cheesy and smelled really good. I conveniently bypassed the instructions to let the dish sit 10 minutes before you eat and immediately dug in, searing the roof of my mouth with molten chicken-cheese mixture. I'll survive. Besides, by this point it was 9:10pm and I was hungrier than a French runway model. The chiles were apparent, but in no way hot (spicy hot, that is). The casserole was not soupy at all and I think the tortillas had soaked up a lot of the moisture, as the tortillas toward the middle of the dish were soggy. However, everything mixed together so well that the soggy tortillas didn't bother me.


Overall, I would cook this again. Halved, this makes a perfect dinner for two with a little leftover for the next day. It's also from Cooking Light so it's not horrible for you. I had to make just a few adjustments in my recipe, again, for items I didn't have at my local store (regular evaporated milk as opposed to evaporated skim milk) but all in all, this is a keeper.


*A note on reheating this dish - zapping leftovers in the microwave is a fine way to reheat, but it really does a number on the cheese and tortilla chips on top. The cheese got a little more rubbery and the chips lost their crisp and got tough. All in all, it was still good and not reason enough for me to never nuke any leftover Mexican Chicken Casserole again. This stuff is hella good even the second (and third) time around.