Thursday, August 6, 2009

Lasagna

Albert Einstein once said, “The definition of insanity is doing the same thing over and over again and expecting different results”. Well, I guess this qualifies me as insane. But this time, I beat Einstein and I got the different results I have been seeking since the beginning of lasagna-making time.

Lasagna

1 package lasagna noodles
1 pound ground beef
3 C spaghetti sauce
1 ½ C water
½ C Parmesan cheese
1/4C chopped parsley
½ t salt
2 C mozzarella cheese
15 oz ricotta
2 eggs
¼ t pepper

Heat oven to 350. In a three quart saucepan, brown meat. Add spaghetti sauce and water, simmer 10 minutes. In a bowl, stir together ricotta, half of the mozzarella, Parmesan, eggs, parsley, salt and pepper. Pour about one cup sauce on the bottom of a 13x9 inch dish. Arrange three uncooked pasta pieces over sauce, cover with about 1 cup of sauce. Spread half of the cheese filling over the sauce. Repeat layers of lasagna noodles, sauce and cheese filling. Top with a layer of noodles and remaining sauce; sprinkle with remaining mozzarella. Cover with foil. Bake 45 minutes. Remove foil, bake an additional 15 minutes. Let stand 10-15 minutes before serving. 10-12 servings.


I’ve had this recipe for a few years now. The very first time I made it, the dish turned out great. With that success under my belt, I gave it another try a few months later. The result was a colossal failure. It was way too watery and it absolutely fell apart when you cut into it, just totally inedible. I was shocked and dismayed, but I persevered and tried again. Another disaster. By now the husband is questioning my sanity. Tried again, despite his pleas to never go near the recipe again. Another watery disaster. Completely defeated, I shelved the recipe indefinitely and satiated my lasagna cravings by ordering the dish at restaurants where trained professionals could create the pasta/meat/cheese masterpiece that I was destined to never produce.

So when I was compiling the list of recipes for this project, I found my long lost lasagna recipe and decided to give it another try. I’ve listed the ingredients above just the way the original recipe was written, and when I took a second look at the ingredient list I suddenly understood why my lasagna recipe was lacking. The whole problem was that its cup runneth over – this time with water. The recipe calls for 1 ½ cups of water to mix in with the sauce! It struck me that this was the reason for the problems. Sure you use uncooked noodles in the recipe, but there is no way this much water is required to ensure they are fully cooked and pliable when everything comes out of the oven. So I scrapped the water and voila – a lasagna that is neither watery nor dry and noodles that are completely cooked.


As usual, I made a few changes. I didn’t have any ground beef on hand so I didn’t use any. Meatless lasagna is just as good as the alternative. I also halved the recipe since I am just cooking for myself, and I added feta cheese to the ricotta mixture. The flavor of the feta really didn’t come through all that much, as I didn’t use a whole lot. I also used my fresh herbs from my little herb garden – parsley and oregano.


Lasagna


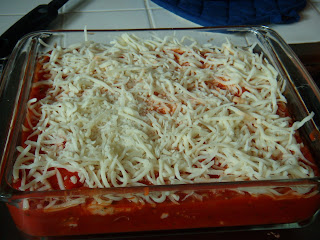
Here’s a tip – the recipe calls for a piece of aluminum foil to cover the dish before it goes into the oven. In my case, the fully assembled lasagna came up to the very top of the dish, including the mozzarella cheese, so in order to keep the cheese from sticking to the aluminum foil I sprayed the underside of the foil with a little Pam, and then put the foil down on top of the dish. That way when you take the foil off after it’s been cooking for 45 minutes, you don’t also pull all the cheese off with it. You’re welcome.


When I checked it after 45 minutes of cooking, I stuck a fork in various parts to check the doneness of the noodles. They were still kind of resistant, and I immediately regretted not adding just a little water to the sauce mix. But it was way too late for that now, so I put it back in the oven for the required 15 minutes and crossed my fingers. When it came out, the sauce was bubbling like a pent up volcano and the cheese had a nice browning around the edges. I let it cool for a few minutes and then cut a slice, noticing the noodles had definitely softened up in that last 15 minutes. Thank goodness.

Lasagna


The taste was good, but not earth shattering. It tasted like lasagna, and it was better than some places I’ve eaten lasagna as of late. I would cook it again. But the main thing is that it actually turned out well and was distinguishable as lasagna, not a watery mess. Huge accomplishment.

Tuesday, June 16, 2009

Basil, Sage, Cheese and Tomatoes with Rice – High Summer Risotto

Risotto, you evil temptress of the night. You appear to be easily conquered, at least on paper, but you are devilish in your culinary trickery. Your tasteful sophistication and Italian background lured me in, but I was caught in your snares within minutes of diving into your menacing cuisine. Oh, risotto, you have won this battle, but mark my dying words, you most certainly have not won the war.


BASIL, SAGE, CHEESE AND TOMATOES WITH RICE - HIGH SUMMER RISOTTO

Tuscany
Preparation - Medium/Difficult
Serves 8

1 medium white onion, finely chopped
1/4 cup finely chopped basil, plus 2 T slivered basil leaves
1/4 cup finely chopped flat-leaf parsley
2 T finely chopped sage
2 T extra virgin olive oil
2 cups Arborio, carnaroli, or vialone nano rice
salt and freshly ground white pepper to taste
1/2 cup dry white wine
2 1/2 cups peeled, seeded, and chopped perfectly ripe, sweet, fresh tomatoes
1 cup hot chicken stock, or more if necessary
1/2 cup freshly grated Pecorino Toscano or Parmigiano-Reggiano
2 cloves garlic, finely minced

In a large heavy saucepan over medium-low heat, sweat the onion with the finely chopped basil (the slivered basil will be added later), parsley, and sage in the oil until the vegetables are very soft. Do not let them brown. Mix the rice into the vegetables and add salt and pepper. Stir slowly and when rice starts to turn opaque pour in the wine.


As soon as most of the wine has been absorbed by the rice, add about half the tomatoes to the dish, stirring to mix well. Continue to cook the rice, stirring frequently; as the liquid in the tomatoes is absorbed, add hot chicken stock, 1/4 cup at a time. (You may not need all the chicken stock to finish the risotto.) The risotto is cooked when the grains of rice are still separate and slightly resistant to the bite but bathed in a thick sauce.


At this point remove the pan from the heat and quickly stir in the cheese, the remaining tomatoes, the slivered basil, and minced garlic. Cover and let rest for 10 minutes, then serve immediately.


So what I'm really trying to say in the above soliloquy is that when a recipe says "Difficult," they're usually not kidding. But I had two other recipes I thought would be difficult - this one and this one - and they still turned out really well. So while I didn't think this risotto would be a breeze, I certainly didn't think it would be as ornery as it actually turned out. It wasn't a colossal failure like other recipes, but it definitely needs some fine tuning.

It actually started well. I put this recipe into thirds since I was only cooking for myself, so I broke down the measurements and was ready to rock. I have had only one other run in with risotto and I knew the liquid would make or break the dish, so I made sure to have a whole can of chicken stock, plus additional white wine. I felt I had covered all my bases.

What I didn't anticipate was that my risotto had every intention of soaking up every last drop of liquid I had in the house. I used an entire 15 oz can of chicken broth, and at least 1/2 cup of white wine, plus some tap water. I know, blasphemy. But I was desperate. Even after adding in all of that liquid and standing over the risotto constantly stirring for an hour, the grains were still more than "slightly resistant to the bite," and they were not "bathed in a thick sauce." I had more white wine to use, but I didn't want that flavor to overwhelm the dish, so that's when I turned to the tap water (so shameful). I think I eventually could have reached the risotto promised land, but I didn't have the desire to wait it out. I finally added the cheese, tomatoes, basil and garlic and plated it up.

Basil, Sage, Cheese and Tomatoes with Rice


The grains were still dense, but I could get the general taste of the dish. It was pretty rich and I can't imagine eating a whole lot by itself. It would be a great side dish. If I had one more can of chicken stock I think I could have pulled it off, but for some reason I only had that one can. I usually have army rations of the stuff in our pantry, but it just was not meant to be. But again, with some modifications and more liquid, this has a real shot of being something nice.

Wednesday, June 3, 2009

Grilled Cheese with Spinach-and-Tomato Sauce

I was so excited about this recipe. I mean, who doesn't love grilled cheese sandwiches? Cheese is such a universally delicious food and when you pair it with bread and a hot skillet, you have your own little piece of heaven. They even have gourmet grilled cheese restaurants! But as wonderful as a gooey grilled cheese sandwich can be, I think this may have overdone it a little bit.


Grilled Cheese with Spinach-and-Tomato Sauce

SERVINGS: 4
Ingredients
4 tablespoons olive oil
1 small onion, chopped
2 cloves garlic, minced
1 cup canned crushed tomatoes in thick puree (from one 15-ounce can)
1/2 teaspoon salt
1/4 teaspoon fresh-ground black pepper
1 pound spinach, stems removed, leaves washed well and shredded
8 thick slices from a large round loaf of country bread
1/2 pound mozzarella, sliced
1/4 pound mild goat cheese, crumbled (about 3/4 cup)


Directions
In a large saucepan, heat 2 tablespoons of the oil over moderately low heat. Add the onion and cook, stirring occasionally, until translucent, about 5 minutes. Stir in the garlic, tomatoes, salt, and pepper. Simmer for 5 minutes. Add the spinach and simmer until the spinach wilts and the sauce thickens, about 5 minutes longer. Cover to keep warm.

Top 4 slices of the bread with mozzarella. Spoon some of the spinach mixture over each, spreading the spinach to the edges of the bread. Sprinkle the goat cheese over the spinach and top with the remaining bread slices.

In a large nonstick frying pan, heat 1 tablespoon of the oil over moderate heat. Cook two of the sandwiches, turning once, until the cheese melts and the bread is golden, about 4 minutes in all. Repeat with the remaining 1 tablespoon of oil and the other two sandwiches, keeping the first batch of sandwiches warm on a baking sheet in a 200° oven.


I did have to adapt this recipe. For starters, I didn't use spinach. I didn't want to buy a whole bag of it and not have any more uses for it, and then have it go bad. Also, I used regular 100% whole grain sandwich bread instead of a "large round loaf of country bread," which I guess could mean french bread. I couldn't find any in the store that I liked, so I just used what I already had on hand. And again with the "1 small onion, chopped." Even if I were to have a small onion, I still wouldn't use the whole thing! Who in their right mind would use that much onion for a recipe like this. Crazy. I used one slice and that was plenty.


The mozzarella was a brand we have used before, Mozzarella Fresca. But the packaging was different this time around. And when I sliced into it, it looked a little like swiss cheese. There must have been some air bubbles in the mozz ball when it was packaged or something. It tasted almost the same. It was strange, but I used it anyway. A good way to slice cheese like this is to put it in the freezer for a little while before you're ready to use it. The cheese will firm up and it will be easier to cut and won't squish. I cut three slices and put them on the bread. Then I spooned on some of the tomato mixture, sans spinach, and topped it with the crumbled goat cheese.


In an effort to save me from having to wash more pans, I pulled out the old standby: the George Foreman grill. This thing is at least eight years old and it's still ticking. Good old George. I brushed the surface of the grill with a little vegetable oil and put the sandwich in place, closing the lid as much as it would go with my over stacked sandwich.


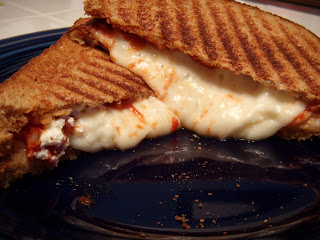
A few minutes later, the sandwich was done and I was ready to eat. The first thing I noticed when I lifted the sandwich onto the plate was how heavy it was. I mean, dense. The cheese seemed to have doubled in volume in just a short amount of time. I had The Blob on my sandwich. When I cut into it, the cheese just oozed out every side of the sandwich. Usually a good sign, right?

Grilled Cheese with Spinach-and-Tomato Sauce


Could it be... this was too much cheese? You can see the tomato mixture and goat cheese peeking out from the left there, but the rest of the sandwich was taken over by the mozzarella. There were some seriously chewy bites, but I persevered. Whoever came up with this recipe had their heart in the right place, but it was a bit too much. It's possible I used too much mozz cheese (three slices, none too thick) but that's a lot of melting action going on. This probably could be adapted into something wonderful. Overall, it's pretty hard to screw up a grilled cheese sandwich, and for what it's worth, I think this was good.

Pasta with Broccoli Raab, Goat Cheese, Sundried Tomatoes and Toasted Pine Nuts

Unlike most of the other recipes I've made so far, I actually stayed pretty close to the measurements on this particular recipe. With the exception of substituting a regular broccoli crown for broccoli raab, this was created to the letter. Yes, real butter and extra goat cheese. I don't think this was very healthy, but it really hit the spot.


Pasta with Broccoli Raab, Goat Cheese, Sundried Tomatoes and Toasted Pine Nuts

1 T extra virgin olive oil
3 C broccoli raab cut into small pieces
2-4 minced garlic cloves
¼ to ½ t crushed red pepper flakes
Salt/ground pepper
1 ½ C canned chicken broth
1 t chopped fresh thyme
4 T unsalted butter, cut into small pieces
4 oz creamy goat cheese, crumbled
¾ lb dried bowtie or orecchiette pasta
4 T thinly sliced sun dried tomatoes
2 T pine nuts, toasted in a small skillet over low heat until golden, 3-4 minutes


Bring a large stockpot of water to a boil. Meanwhile in a 12-inch sauté pan, heat the olive oil over medium-high heat. Add the broccoli raab, garlic and red pepper flakes and sauté, stirring frequently until bring green and tender crisp, 2-3 minutes. Season lightly with salt and pepper and then transfer to a bowl and set aside.

Still over medium-high heat, add the chicken broth to the pan and stir and scrape to deglaze the pan deposits. Add the thyme. Bring the liquid to a boil and continue boiling briskly until it reduces to half its original volume, 7-10 minutes. Add the goat cheese and butter and stir until the goat cheese melts. Cover and keep warm.

As soon as the stockpot of water comes to a full boil, add a little salt to the water. Add the pasta and cook until al dente. Drain the pasta and immediately add it to the pan of sauce along with the broccoli raab and the sun dried tomatoes. Heat mixture thoroughly, season to taste. Sprinkle with pine nuts.


This was a pretty indulgent dish. The sauce came together nicely, especially after deglazing and letting the stock boil down. I cooked the pasta right alongside everything else so it all came together at the same time - kind of rare for me. Usually everything gets done at different times and I have to cover everything or stick it in the oven to stay warm, but not this time. It also helps to have all of your ingredients out and pre-measured before you start. Chop the broccoli, measure out the chicken broth, measure out the butter and goat cheese - stuff like that. It just helps things move along better.


Pasta with Broccoli Raab, Goat Cheese, Sundried Tomatoes and Toasted Pine Nuts


The sauce covered much better than how it looks in the picture. It was very creamy, especially with the butter and cheese, and the flavors were really top notch. It coated the pasta and wasn't too overwhelming. I did catch a few spicy bites due to the red pepper flakes, but I did add a few extras in there. I'm a sucker for red pepper flakes.

The husband is not a fan of broccoli - yet. He did eat a raw piece of it a few weekends ago and lived to tell the tale, but I don't foresee him eating a huge hunk of it in the near future. I'm still holding out hope, though. If you're not a broccoli fan, that could easily be substituted for red/yellow/orange sweet pepper strips, snow peas, zucchini chunks, eggplant or almost any other vegetable. This is a pretty adaptable meal, and one I would love to make again.

Monday, June 1, 2009

Crispy Curried Chicken Tenders with Cilantro Dipping Sauce

I made this recipe the other night, but I'm going to have to make it again soon. Not that I messed it up or anything, but I was afflicted with some nasty allergies when I made this for dinner and my stopped up nose wasn't working too well. Therefore, this meal ended up tasting really muted. It still tasted good, but I need another go at it when I'm not sickly.


Crispy Curried Chicken Tenders with Cilantro Dipping Sauce
ACTIVE: 45 MIN
SERVINGS: 4
Ingredients
1 cup mayonnaise
2 cups loosely packed cilantro leaves
2 tablespoons fresh lemon juice
Kosher salt and freshly ground pepper
1 tablespoon plus 1 teaspoon Madras curry powder
1/2 teaspoon cayenne
1/2 cup all-purpose flour
3 large eggs, beaten
2 cups panko
2 pounds chicken tenders
3/4 cup vegetable oil

Directions
In a food processor, blend the mayonnaise with the cilantro and lemon juice until the cilantro is finely chopped. Season with salt and pepper and refrigerate the dipping sauce until ready to serve.


In a small bowl, combine the curry powder with the cayenne and 1 tablespoon of salt. Put the flour, eggs and panko in 3 shallow bowls. Stir 2 teaspoons of the curry powder mixture into the panko. Season the chicken tenders with the remaining curry powder mixture.

Dredge the chicken tenders in the flour and shake off any excess, then dip them in the eggs and coat thoroughly with the panko mixture. In a large skillet, heat half of the oil until shimmering. Add half of the chicken tenders and fry over moderate heat until golden and cooked through, about 10 minutes. Drain on paper towels. Repeat with the remaining oil and chicken tenders. Serve with the cilantro dipping sauce.


Aside from the stopped up nose and somewhat bland taste, I think this would have been really good under different circumstances. The seasoning is what didn't register as much as it normally would have, but the panko made for a wonderfully crunchy texture and they weren't oily and greasy like you would normally find things cooked in oil. A hot pan of oil and the panko really make the difference here.

Crispy Curried Chicken Tenders with Cilantro Dipping Sauce


This dish came together really easily. I think I still might add more curry powder to my next attempt. There needed to be a little more of a punch than what I got when I ate them. Also, this Cilantro Dipping Sauce. I have an aversion to mayonnaise that causes me extreme distress when I have to eat said substance in any form other than chicken salad or potato salad. Even then, you had better go lean on the stuff. Therefore, I could not, in good conscience, whip up a dipping sauce that called for that much mayo, and even halved with 1/2 cup I could not bring myself to do it. So I ate them plain, and they were still fine (albeit bland). I tried to dip them in ranch dressing but that was not good, so they stayed plain.

I'll make this again when I'm feeling better. Also, I get the feeling this is a little better for you than all out fried chicken because you're not using as much of the oil - just a little. Also, I used whole wheat panko, so that's double on the healthy score. Thumbs up all around.

Monday, May 18, 2009

Gingerbread

Ahh, the holidays. A time to fellowship with family you don't see very often, eat way too much food and fall into a turkey coma watching football. And when the tryptophan wears off, it's time to go back for seconds - this time to the dessert table. At my family's holiday celebrations, sometimes it seems like there are more desserts than anything else - chocolate cake, fruit pies, chess pies, cookies and brownies. Oink. But this gingerbread recipe would really set the tone for the holidays. Now this is not a cookie, but it's actual gingerbread. Moist, rich, dense and downright delicious.


Gingerbread

1 C granulated sugar
½ C applesauce
¼ C butter
¼ C molasses
2 C all-purpose flour
4 t ground ginger
1 t ground cinnamon
1 t baking soda
¼ t salt
1 C fat-free buttermilk
2 large eggs, lightly beaten
Whipped cream, optional

Beat the first four ingredients at medium speed with an electric mixer until blended.

Stir together flour and next four ingredients in a medium bowl. Combine buttermilk and eggs in a separate bowl. Add both mixtures alternately to butter mixture, beginning and ending with flour mixture. Beat at low speed until blended after each addition. Pour batter into a lightly greased 10-inch cast-iron skillet.

Bake at 325 for 35-40 minutes or until a wooden pick inserted in center comes out clean. Serve with whipped cream, if desired.


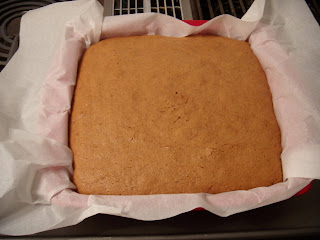
First things first - I will definitely cook this again and I will proudly put my name all over it. It's so good, and even better after a few days because the top of the gingerbread gets kind of sticky. It comes together very easily, so no problems there. When I cooked it, I did not use a cast iron skillet and here's why: we have two cast iron skillets, one for cornbread that belonged to the Husband's great-grandmother and one miscellaneous one that is possibly as old as the former, but it is most certainly not for sweets. I used it before for fried chicken. If I were to put gingerbread in either of those skillets I would never hear the end of it. So I used a 9x9 silicone baking pan lined with parchment paper, which worked wonderfully. The gingerbread lifted right out once it was done with no cleanup necessary.

Gingerbread


One error I made was simply a result of how eager I was to try the gingerbread - I cut it too soon before it cooled down enough. That resulted in some crumbly pieces, but they didn't go to waste (translation: I ate them). This recipe filled up the entire 9x9 pan so there was a lot to go around. I took about 10 pieces to work and my hungry co-workers did their part to make sure the Husband and I weren't tasked with eating the entire batch, though we certainly could have. And if you add whipped cream, whoa nelly. You're in for a real treat.

Gingerbread


This was a delicious recipe that will certainly become a favorite for us.

Pecan Crusted Tilapia

Tilapia is the kind of fish that takes other flavors very easily. It's so mild that if you cook it with anything else, the texture is really the only thing that remains to remind you're eating fish - the fish taste simply vanishes. We've done a really nice meal before with tilapia - cajun seasoning on the fish with red and green peppers and tomatoes - and I decided to give this recipe a try recently. I bought this bag of frozen tilapia fillets from Target (their Market Pantry brand) and when we had one before, the Husband said it tasted a little too fishy for tilapia. So I made this recipe when he worked late that night and figured I could make it again for him if it worked out. I will say that it didn't work out, but it wasn't just one thing - it was a combination of problems.


Pecan Crusted Tilapia

Serves: 4
Prep: 10 minutes
Cook: 8 minutes

½ C pecan halves
4 (6 oz) fresh tilapia fillets
1 t salt
½ t garlic powder
¼ t pepper
3 T butter

1. Process pecans in a food processor until finely chopped. Sprinkle fish with salt, garlic powder, and pepper. Dredge fish in finely chopped pecans.

2. Melt butter in a large nonstick skillet over medium-high heat; add fish, and cook 3-4 minutes on each side or until well browned and fish flakes with a fork.


I defrosted the tilapia overnight and it was ready to go. That's where a crucial step was left out of the recipe directions - pat the fish dry first. I really think this omission was the beginning of the end. I ground the pecans in my little food processor and spread them on a paper plate, seasoned the fish as directed, and then plopped the fish down on the plate to 'dredge' it in the chopped pecans. What started happening immediately is that the chopped pecans, finely chopped mind you, started to clump together and didn't want to adhere evenly to the fish. Then when I tried to spread them around to cover more of the fillet, they clumped more and started sticking to my fingers like dough. Ugh. I think patting the fish dry would have helped, but part of me thought the pecans might have been too fatty to use for this recipe. On the other hand, the Husband and I had a wonderful pecan-crusted trout at a fantastic tapas bar in Asheville, NC, a few years back and it was fantastic. So I know it can be done, but it just didn't want to work out for me.


Pecan Crusted Tilapia


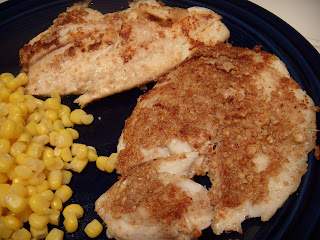
I managed to get one piece semi-dredged in the chopped pecans, but by that point I had used up almost all of them up. I didn't want to chop more and waste them, so I applied the rest of the nuts to the other fish fillet as best I could, and put them in the pan. Here's where my next crucial error took place - I used too much butter in the pan. If the fish and nuts weren't soggy to begin with, they certainly were now. I also heated the pan too soon, so I had to remove the pan from the eye about 20 seconds before the fish were completely dredged and ready, as the butter had already started to smoke a little bit. I added more to compensate, but it was too much all together. At this point I was faced with one tilapia fillet with too many nuts in an uneven covering, one fillet with not nearly enough nuts, and too much butter in the pan. I was a hot mess.

Pecan Crusted Tilapia


After I felt the fish had cooked enough, which was a good bit longer than the 3-4 minutes suggested in the recipe, I removed them to a plate for inspection. The nuts hadn't really browned and they still weren't adhering very well. The one sad fillet with minimal nuts had pretty much lost the few survivors in the pan with the overabundance of butter, so he was naked. I covered him up with the other fillet. The taste was really underwhelming. Sure enough, the tilapia taste was pretty much nil, save for the nuts and salt, pepper and garlic powder, of which I could have added much more. The nuts were soggy and didn't have any crunch to them and the tilapia really did taste kind of fishy. I ate most of the two fillets I cooked to avoid throwing away my entire dinner, but I couldn't choke it all down. Even if I were to fix a few of my errors, I don't think I would cook this again.

Tuesday, May 12, 2009

Yucatan-Style Chicken, Lime and Orzo Soup

I did a little bit of research before writing this blog entry to find out more about this soup. I found it on the Epicurious site and it looked pretty popular. But now that I go back and see some of the reviews, I'm stumped. Lots of people said it was bland, some said it was the best thing they've ever had, and only a few mentioned the presence of lime in this dish. I don't know what lime has to do with the Yucatan area of Mexico, but they certainly must like it. However, the Husband and I didn't.


Yucatan-Style Chicken, Lime and Orzo Soup

3/4 cup orzo (rice-shaped pasta)

1 1/2 tablespoons olive oil
1 medium white onion, thinly sliced
6 garlic cloves, thinly sliced
2 jalapeño chiles, thinly sliced
3/4 pound skinless boneless chicken breasts, cut into matchstick-size strips
5 cups low-salt chicken broth
1/4 cup fresh lime juice
1 large tomato, seeded, chopped
1/4 cup chopped fresh cilantro
Fresh cilantro sprigs


Cook orzo in pot of boiling salted water until just tender. Drain well.

Heat oil in large saucepan over medium heat. Add onion, garlic, and chiles. Sauté until onion begins to brown, about 4 minutes. Add chicken; sauté 1 minute. Add broth, lime juice, and tomato. Simmer until chicken is cooked through, about 3 minutes. Mix in orzo, then chopped cilantro. Season soup with salt and pepper. Ladle soup into 4 bowls. Garnish with cilantro sprigs. Makes 4 servings.


Again, I halved this recipe because it's just the two of us and, well, this soup looked a little suspicious. It's better to make a small portion of something that's inedible rather than a large portion. But let me say that this soup wasn't inedible, and it didn't even, as the Husband and I joked, "put the 'Yuc' in Yucatan." It was okay, but we were correct that it wasn't all that filling, and the lime was just so strong. I didn't even put the full halved amount into the soup because I was a little wary of that much sour in the broth. It was okay.

Yucatan-Style Chicken, Lime and Orzo Soup


I did a few things differently. Instead of orzo, I used whole wheat brown rice from Whole Foods. We bought it dried in bulk and it's so good. Very nutty and a lot like the sticky rice you would find at a good Asian restaurant. That helped add some bulk to the soup. I used one chicken breast and did the thin slices. I only used one jalapeno, but I think two may have helped to overpower the lime juice somewhat. We didn't use nearly as much onion as it calls for. What is it with recipes calling for an entire onion? Ridiculous. Then I dropped a handful of cilantro into the soup which was a good kick.

This soup really had potential but the lime just turned us off. The rest of it wasn't good enough to where we would likely try it again with less lime; I think this is just a dud.

Monday, April 27, 2009

Five Minute Chocolate Cake in a Mug

Don't laugh. You know you want to make this yourself. That's a pretty tempting title and now you're intrigued, aren't you? Of course, you could have been one of the 2,394,042 people who received this recipe in an email forward and a message something along the lines of, "OMG you have to try this! It is SOOOOO cool and it really works!!" Normally when I get an email with a message that sounds like a chain letter, I delete it. But naturally, I was drawn to the recipe because I'm a sucker for chocolate, and especially chocolate that can be made into cake form in less than five minutes AND doesn't even require an oven. I'm all about simplicity. And somewhere deep inside, I secretly hoped this recipe wouldn't work. I don't need to be five minutes from a hunk of chocolate cake. It's not good for the waistline. But after trying this, I am sold. And I may need to invest in some pants with an elastic waistband.


Five Minute Chocolate Cake in a Mug

4 tablespoons self rising flour
4 tablespoons sugar
2 tablespoons Hershey's cocoa (regular or dark)
1 egg
3 tablespoons milk
3 tablespoon oil
3 tablespoons chocolate chips (optional)
a splash of vanilla extract (optional)
cooking spray for easy clean up
1 large coffee mug or hot chocolate mug


Add dry ingredients to mug, and mix well. Add the egg and mix thoroughly. Pour in the milk and oil and mix well. Add vanilla extract and coat the chocolate chips with flour (if using, this will prevent the chips from collecting on the bottom.), and mix again. Put your mug in the microwave and cook for 3 minutes in a 1000 watts microwave. Adjust time if needed. The cake will rise over the top of the mug a little, but don't be alarmed. Allow to cool a little, and tip out onto a plate if desired.


*snort* Like chocolate chips are ever optional. Whatever. That's funny. So anyway, I was chuckling to myself as I put this concoction together. I kept thinking that there was no way this would work out - it was just too simple! But as the ingredients gradually came together I realized this was starting to resemble actual cake batter. It was precisely at that moment that I knew I was in big trouble if this actually creates an edible cake. And did it ever. I am so in trouble. It's really, really good.

Five Minute Chocolate Cake in a Mug


Don't you just want to jump through the computer screen and take a huge bite? Yes, you do. Because there is easily enough for two (or three) people to dive into this thing. I did coat the chocolate chips with flour but they still sunk to the bottom of the mug after cooking. And regarding the mug, I used the biggest one I have. It's probably 5.5" tall with about a 3.5" wide mouth. I'm just estimating here, but it's bigger than your run of the mill coffee mug. When it was baking, the cake rose up over the top by about an inch, but there were only those small drips down the side. And you'll see there is a mention of cooking spray in the ingredient list but no mention of applying said cooking spray to the inside of the mug before you add the ingredients. I think the spray would work, although I didn't use it and all I had to do was run a knife around the outside edge of the cake to loosen it enough for the cake to plop out (with the exception of the chocolate chips). I think I would apply the cooking spray, mix the ingredients in a separate bowl and then pour into the mug. That might work.

The texture of the cake was pretty spongy and not quite as moist as a box cake mix would be. The taste was good. Like, really good. For the minimal effort that goes into the recipe, the taste delivers tenfold. No, it's not Duncan Hines or Betty Crocker, but it works well in a pinch. If you need a quick chocolate fix or you have a birthday girl/boy coming over on short notice, whip this up. You can even throw on some icing and pop a candle in the top. Make it. You know you want to. I'll even share my elastic waistband pants with you.

Grilled Tuna with Tomato and Cucumber Salad

Man, talk about a summer recipe. Everything about this dish screams sun and outdoors grilling and skimpy bikinis. The Husband especially screams about that last part.

Grilled Tuna with Tomato and Cucumber Salad

TOTAL TIME: 25 MIN SERVINGS: 4

Ingredients

1/4 cup extra-virgin olive oil, plus more for brushing
2 tablespoons red wine vinegar
Salt and freshly ground pepper
2 1/2 pounds tomatoes, cut into 1/2-inch dice
2 scallions, thinly sliced
1 large cucumber—peeled, seeded and sliced crosswise 1/4 inch thick
1 small red onion, thinly sliced
1 cup torn basil leaves
1 1/2 tablespoons Dijon mustard
1 1/2 tablespoons balsamic vinegar
1 tablespoon hot water
Four 6-ounce tuna steaks
2 teaspoons dried oregano


Directions:

Light a grill. In a large bowl, whisk the olive oil with the red wine vinegar and season with salt and pepper. Add the tomatoes, scallions, cucumber, red onion and basil and toss to coat. Refrigerate the salad. In a small bowl, whisk the mustard with the balsamic vinegar and blend in the hot water. Season with salt and pepper. Brush the tuna steaks with olive oil and season with salt, pepper and the oregano. Grill the tuna over a hot fire until lightly charred on the outside and rare inside, about 2 minutes per side. Transfer to a carving board. Mound the tomato salad on plates. Thickly slice the tuna steaks and transfer to the plates. Drizzle the tuna with the balsamic dressing and serve.


And in addition to this being really good, it's pretty healthy, which is a key factor in what we've been eating lately. We got the tuna steaks frozen at Target and the directions on the package tell you everything you need to know about cooking them. Fish isn't scary, it's tasty! Embrace the fish, people. The thing about tuna, however, is that it's best cooked rare to medium-rare. So far, we have been mostly unsuccessful in getting the fish to that level. We always overcook, and part of it is that I always say, "That looks a little too raw for me in the middle; why don't you cook it for about another two minutes," and then when it comes off the grill it's always cooked all the way through. I've got to remedy that. And tuna steaks do not taste anything like tuna from a can. It's completely different and if done right, not nearly as fishy. Good fish shouldn't taste overly fishy anyway.


Grilled Tuna with Tomato and Cucumber Salad


The tomato salad in the recipe would be good as a side item all by itself. Paired with the fish it just really completes the whole recipe. I halved the recipe for the salad and only cut two slices of onion to chop up. A whole onion is a lot for this recipe, and we're not huge onion people. I believe I used the full amount of mustard-balsamic glaze to go on top of the fish and it wasn't too strong, but you do have to be careful so as not to completely cover up the taste of the fish all together.

This just really came out well. We would definitely have this again!